
Required Reading
None.
Java Web Start vs. Applets
It used to be that Applets(JApplets) only ran within the single JVM running in the web browser. Since Java 6 Update 10, this is no longer true. Due to this, the difference between the two is now not very much. The bottom line is that a JApplet must start in the browser and can communicate with the browser to other values from the web site. Java Web Start applications are much more like stand-alone Java Applications. They can run with no internet connection, but will update themselves automatically from a server is an internet connection is available.
Update: As of Jan 14th, 2013 (JDK7u51) Web Start and Applets are no longer "do it yourself" options. To run from a browser, they need to be signed with a cert from a Trusted Authority...so even though you can self sign certs, they really won't do you any good any longer.
This is from the Oracle (Sun) website:
As of 7u51, (January 14, 2014), your RIAs must be updated. The updates required are on the packaging and distribution; no API code changes should be required. The impetus for these changes relates to potential re-purposing of sandboxed applications, whereby placing permissions within a signed JAR prevents modification of your specified permission level.
RIAs must contain two things:
- Code signatures from a trusted authority. All code for Applets and Web Start applications must be signed, regardless of its Permissions attributes.
- Manifest Attributes
- Permissions – Introduced in 7u25, and required as of 7u51. Indicates if the RIA should run within the sandbox or require full-permissions.
- Codebase – Introduced in 7u25 and optional/encouraged as of 7u51. Points to the known location of the hosted code (e.g. intranet.example.com).
Due to this security change, this part of the assignment is a "reading only" section, since many of the examples will no longer work without a full-blown security certificate.
So, Web Start and Applets are still usefull, and this change should answer many of the security issues that have plagued Java in the browser for a long time...however it also means that these type of RIAs will only be able to be used from companies, as you and I aren't going to spend the money it takes to get a "real" certificate (they don't come cheap).
It is still worth while to realize these options exist though...so here we go...
Advantages of Applets (JApplets)
Advantages of Java Web Start
Java Web Start
Below is an overview of Java Web Start. For a more complete description, visit the official Sun documentation on Java Web Start. With many of the limitations and difficulties that plagued Applets, Sun developed something that gave people the best of both worlds. Java Web Start is designed to make it easy for users to access remote Java applications. Java Web Start is installed automatically with JDK 1.4+.
Unlike Java applets, Web Start applications do not run inside the browser, and the sandbox they operate in does not have to be as restrictive. In addition, the Java Web Start process makes it easier to manage which versions of Java are required for an application to run on a users machine. In addition, if the user does not have the correct version of the JRE required by the applications, Java Web Start will automatically download the correct version.
Java Web Start uses the Java Network Launching Protocol (JNLP). This protocol is defined by an XML file and it specifies how a Web Start applications is launched. The JNLP provides support for multiple versions of Java and support for native libraries,.
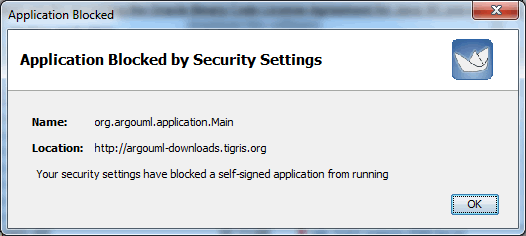
Note: As of Jan 14th, 2014 the following example won't run, because it uses a "self-signed" certificate. Instead of the app, you get the following message
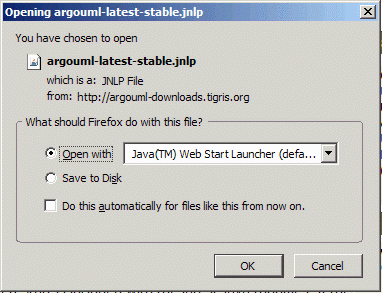
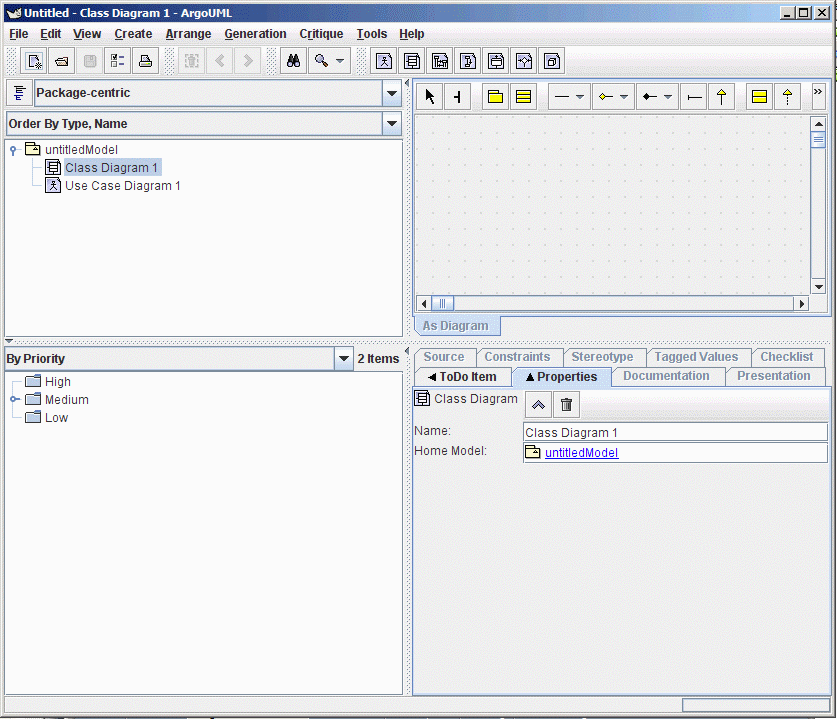
An example of a Web Start application can be found at Tigris.org. The ArgoUML tool is a leading open source UML modeling tool and includes support for all standard UML 1.4 diagrams. Click here to run the tool. After you click the link, a window will appear asking what you should do with this file. Note that with a Web Start application, you can close the browser once it starts loading as it is completely independent of the browser.
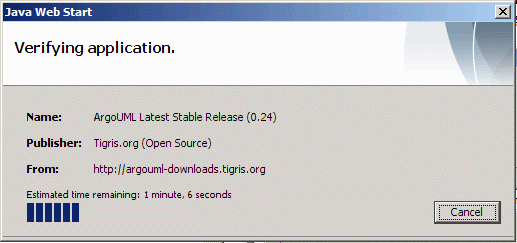
Click the OK button, and the following window will appear
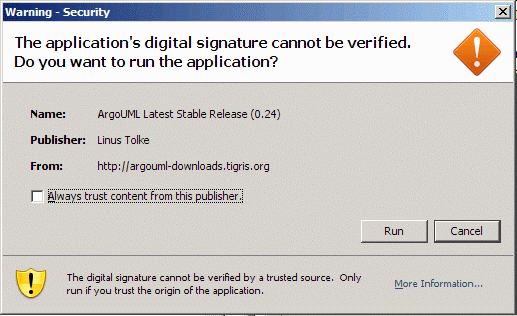
After the application downloads, you will be asked to trust the application. If the jar you download is unsigned, the Web Start application has many of the same restrictions as an applet, but if the application is a signed jar (this one is), it asks you to accept it, and in doing so, enables it to have more access to your local machine than an applet or an unsigned jar would.
Once you click on the Run button, the application will run on your desktop.
Getting Started
Getting a Java Web Start application configured is similar to setting up a JApplet. You'll need an HTML page, the application, and a .jnlp file which tells Java Web Start how to run your application.
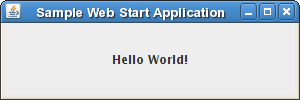
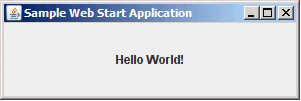
The first step is write your Java application. Below is a quick GUI application that has the text "Hello World" in a window.
package samplewebstart;
/*
* Hello.java
*
* Created on August 30, 2007, 8:39 AM
*
* To change this template, choose Tools | Template Manager
* and open the template in the editor.
*/
import java.awt.*;
import javax.swing.*;
import java.awt.event.*;
/**
*
* @author evansrb1
*/
public class Hello {
/** Creates a new instance of Hello */
public Hello() {
}
/**
* @param args the command line arguments
*/
public static void main(String[] args) {
JFrame jf = new JFrame("Sample Web Start Application");
JLabel jl = new JLabel("Hello World!", JLabel.CENTER);
jf.getContentPane().add(jl, BorderLayout.CENTER);
jf.setSize(300, 100);
jf.setVisible(true);
}
}
If you put this in a netbeans project and run it, the following will appear:
Please note, since we haven't told the application to stop the JVM when it is done, you will have to go to the Runtime tab, select Processes, and then right click on the application name and end the process.
Package your application as a jar file
Actually, this next step is quite easy. In netbeans, just "build" the project. It will pack all of your class files into a jar file in the dist directory of your application. If you click on the "Files" tab in the upper left pane (shown below) you can see the jar file once you have built the project.
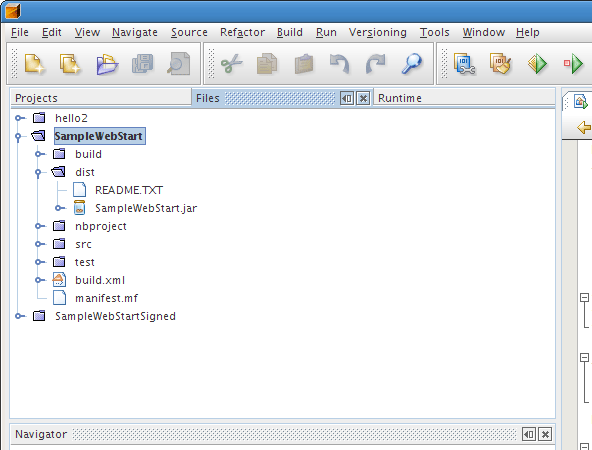
You then need to upload this jar file to your public_html directory on the class computer.
Make a jnlp descriptor for your application
The next step to use Java Web Start is to create a jnlp file on the web server. For the record, there is a large amount of customizable parameters that can be used with a JNLP file. For a complete listing of JNLP syntax, you can look here.
The file below provides the information needed to run the SampleWebStart program above. You may need to change "web7.jhuep.com" to the class computer address.
<?xml version="1.0" encoding="utf-8"?>
<!-- JNLP File for SimpleExample Application -->
<jnlp
codebase="http://web7.jhuep.com:80/"
href="WebStartExample.jnlp">
<information>
<title>Swing Application - Hello World</title>
<vendor>Evans</vendor>
<description>Swing Application - Hello World</description>
<description kind="short">Swing Application - Hello World</description>
<offline-allowed/>
</information>
<resources>
<java version="1.6+"/>
<jar href="SampleWebStart.jar"/>
</resources>
<application-desc main-class="samplewebstart.Hello"/>
</jnlp>
Save this file as WebStartExample.jnlp in your public_html directory on the class computer.
Take a look at the format of the file above. The key XML attributes are as follows
Attribute |
Function |
| information | Holds informative text that gives information about the app and whether it can be run offline or not |
| resources | Required resources for the app to run |
| java version | The required version of Java. If this is not available on the users machine, they will be prompted to download the appropriate JRE |
| jar | The jar file that needs to be downloaded for the application to exist |
| application-desc | This is the Java class name that needs to be run as the main class in the jar file provided above |
It turns out you can specify a lot more than is included in the above table. You can specify memory requirements, os types, icons, insertion into Desktop menus, and you can even pass arguments to your "main" class specified in the jnlp file. See the JNLP File Syntax page at Sun for more details.
As an additional note, if you are developing on a PC, you can now double-click on the WebStartExample.jnlp icon in windows explorer. Java Web Start will download/run the program even without a web browser!
Make an HTML file that points to the jnlp descriptor
Finally you need an HTML on the web server. Upload the following HTML file to your public_html directory.
<!DOCTYPE HTML PUBLIC "-//W3C//DTD HTML 4.01 Transitional//EN"
"http://www.w3.org/TR/html4/loose.dtd">
<html>
<head>
<meta http-equiv="Content-Type" content="text/html; charset=iso-8859-1">
<title>Web Start Example</title>
</head>
<body>
<a href="WebStartExample.jnlp">Launch Web Start Example</a>
</body>
</html>
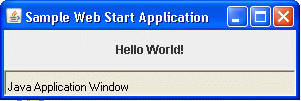
Testing your Java Web Start Application
Point your browser to
http://<the class computer>/~<your login id>/WebStartExample.html,
and then click on the link in the page, you should see something like this.
So, you've done it, you've made a Web Start file. Why do you care? Because for the next few lessons, you can do your development as a regular Java application and don't have to mess with JApplets. When you want to run your application remotely, all you have to do is make an HTML and jnlp file on the web server and upload your jar file.
Signing a Jar file
A simple Web Start application has the same sandbox restrictions as an Applet. It can't access local files, can't get user information. But what if you wanted your application to do those things? It turns out that by signing your jar file, you can release it from the sandbox.
Under normal commercial conditions, you'd get a certificate from a trusted source that would guarantee you are who you say you are. Unfortunately, those certificates can be quite costly. You can self-sign a jar which puts the responsibility on the user to accept it or not.
The discussion below has been based on the Summary of Tools for Java Platform Security. If you are interested in more in-depth descriptions, visit the web site.
Creating a key
To sign your own jar file, the first step you need to do is define a certificate. Java provides a "keytool" which is a key and certificate management utility. It enables users to administer their own public/private key pairs and associated certificates for use in self-authentication.
According to the javadoc api:
A certificate is a digitally signed statement from one entity (person, company, etc.), saying that the public key (and some other information) of some other entity has a particular value. When data is digitally signed, the signature can be verified to check the data integrity and authenticity. Integrity means that the data has not been modified or tampered with, and authenticity means the data indeed comes from whoever claims to have created and signed it.
keytool stores the keys and certificates in a so-called keystore. The default keystore implementation implements the keystore as a file. It protects private keys with a password.
So, if we use keytool, we can create a key that will later be used to "sign" our jar file.
To use keytool, open up a good old command window (or shell if you are lucky), and type:
keytool -genkey -alias <whatever you want to call it> -keypass <a password>
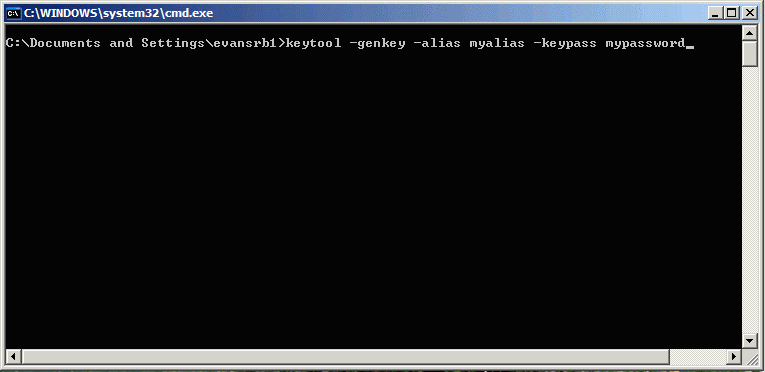
The password you use for this key will be required later when you sign the jar file. After you hit return, the program will prompt you for information that will be associated with the key:
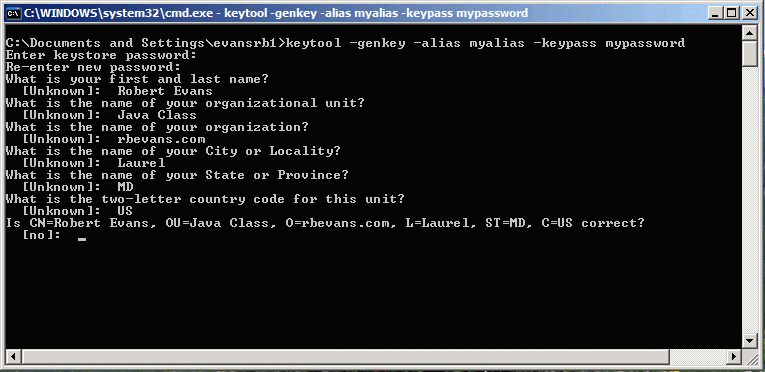
Notice that the first prompt after you hit enter the keytool asks you for a keystore password. This is a "master" password that allows you access to your keystore. This will be used any time you want to access any keys in the keystore. If the information is correct, type "yes" and then hit Enter.
You now have a key stored in your keystore.
Signing your jar
Java also provides the "jarsigner" tool. The jarsigner tool is used for two purposes.
Again, according to the Java API:
The JAR feature enables the packaging of class files, images, sounds, and other digital data in a single file for faster and easier distribution. A tool named jar enables developers to produce JAR files. (Technically, any zip file can also be considered a JAR file, although when created by jar or processed by jarsigner, JAR files also contain a META-INF/MANIFEST.MF file.)
A digital signature is a string of bits that is computed from some data (the data being "signed") and the private key of an entity (a person, company, etc.). Like a handwritten signature, a digital signature has many useful characteristics:
Its authenticity can be verified, via a computation that uses the public key corresponding to the private key used to generate the signature.
It cannot be forged, assuming the private key is kept secret.
It is a function of the data signed and thus can't be claimed to be the signature for other data as well.
The signed data cannot be changed; if it is, the signature will no longer verify as being authentic.
In order for an entity's signature to be generated for a file, the entity must first have a public/private key pair associated with it, and also one or more certificates authenticating its public key. A certificate is a digitally signed statement from one entity, saying that the public key of some other entity has a particular value.
jarsigner uses key and certificate information from a keystore to generate digital signatures for JAR files. A keystore is a database of private keys and their associated X.509 certificate chains authenticating the corresponding public keys. The keytool utility is used to create and administer keystores.
jarsigner uses an entity's private key to generate a signature. The signed JAR file contains, among other things, a copy of the certificate from the keystore for the public key corresponding to the private key used to sign the file. jarsigner can verify the digital signature of the signed JAR file using the certificate inside it (in its signature block file).
At this time, jarsigner can only sign JAR files created by the JDK jar tool or zip files. (JAR files are the same as zip files, except they also have a META-INF/MANIFEST.MF file. Such a file will automatically be created when jarsigner signs a zip file.)
The default jarsigner behavior is to sign a JAR (or zip) file. Use the
-verifyoption to instead have it verify a signed JAR file
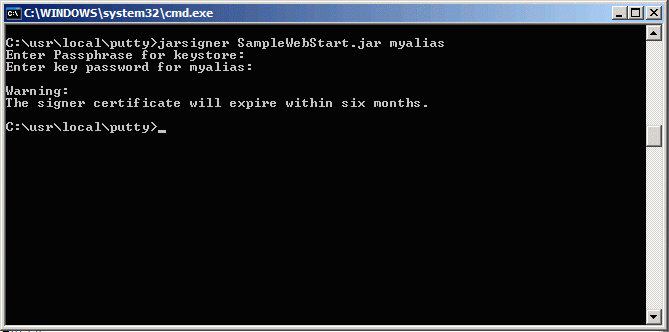
To sign your jar, run jarsigner and give it the jar name you want to sign, followed by the alias of the key you created earlier. It will then prompt you for the passphrase for the keystore (that was the master password) and then it will prompt you for the password you used when creating the key ( the -password argument).
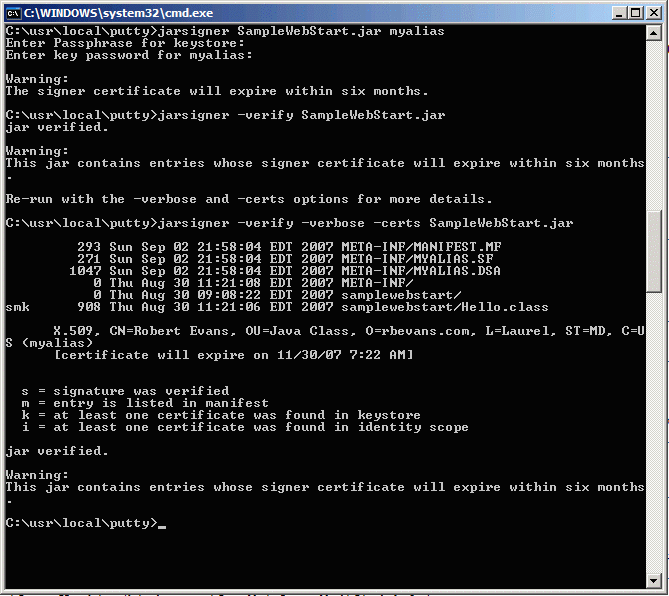
You can check to see if the jar was signed properly by running the -verify option on the jar file. The window below shows the results of the simple -verify option and the -verify option used with the -verbose and -certs flags
Modifying the jnlp file
The next step is to modify the jnlp file you used with the unsigned jar file. In this example, we'll release the application from the security sandbox completely, although you can decide which specific things the application can perform if you wish. The changes are shown in blue below (remember, you may need to change web7.jhuep.com to the class computer name.
<?xml version="1.0" encoding="utf-8"?>
<!-- JNLP File for SimpleExample Application -->
<jnlp
codebase="http://web7.jhuep.com:80/"
href="WebStartExample.jnlp">
<information>
<title>Swing Application - Hello World</title>
<vendor>Evans</vendor>
<description>Swing Application - Hello World</description>
<description kind="short">Swing Application - Hello World</description>
<offline-allowed/>
</information>
<security>
<all-permissions/>
</security>
<resources>
<java version="1.6+"/>
<jar href="SampleWebStart.jar"/>
</resources>
<application-desc main-class="Hello"/>
</jnlp>
Running the signed jar file
Now that you have your signed jar file, upload it and the modified jnlp description to the server (you don't need to change the html file). When you click on the html link, things look a little bit different. It still asks you whether you want to run the jnlp application, but after word you'll get a window similar to this:
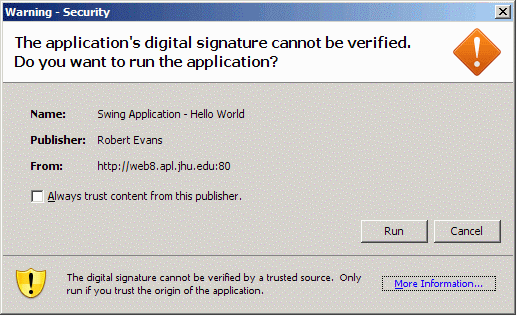
Notice that the window states the name of the application and the publisher, and where the application will be downloaded from. If you click on the "Always trust content from this publisher" you won't get prompted for this window again.
If you click on the "More Information..." button at the bottom right, and get "more info" on the next screen, you'll end up in this window:
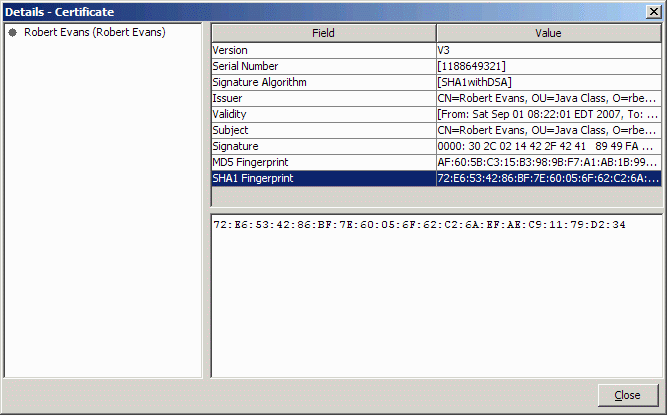
Which shows detailed information about the digital signature associated with the signed jar file.
If you close out the windows, the Hello World window will finally appear. If you look closely (and your short term memory is good) you'll notice something has changed. Since we've given the application full permissions, it runs just like a native application, and the banner at the bottom of the window stating "Java Application Window" is no longer there!
Passing arguments to a Java Web Start Application
With JApplets, we could pass information to the JApplet using the PARAM NAME/VALUE attributes in the referring HTML page. You can do something similar with Web Start applications. The application-desk element in the jnlp descriptor takes "argument" attributes.
Arguments can be specified to the application by including one or more nested argument elements. For example:
<application-desc main-class="Main">
<argument>arg1</argument>
<argument>arg2</argument>
</application-desc>
The order of the arguments in the <argument> tags will be the order passed to the target application.
Debugging and Advanced options
If you work with Web start applications a lot, it would be worth your while to run "javaws -viewer" to take a look at the "Cache Control Viewer", which is actually much more than that. When the viewer comes up, it also open up the "Java Control Panel" shown below (You can also get to this screen by looking in the jre/bin directory where you installed Java and running javacpl.exe (javacpl on linux).
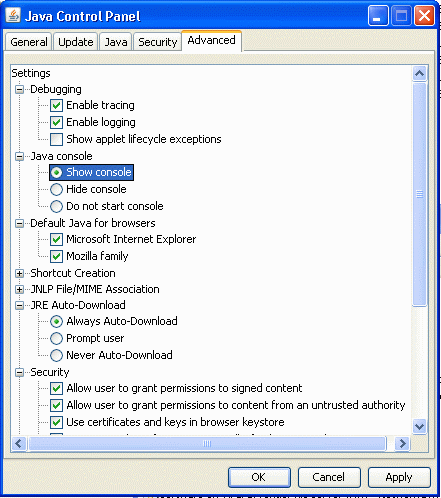
If you look at the screenshot, you'll see options to turn on debugging and logging information, the ability to show a Java Console to watch for stdout/stderr from your application, and a number of other options.
What if Java isn't already installed?
You've already installed Java on your computer, so you won't have to do the following steps for testing, and you know I have it installed, so I won't require this in the homework. The above examples all work great if you have Java already installed. But what if you don't have the correct version on your machine. The page then needs to detect the browser version and install the correct JRE.
As of JDK 6 Update 10, Sun has provided access to a JavaScript file called deployJava.js. This script allows developers to deploy applets and applications to a variety of clients using some simple JavaScript on the initial web page. For a more detailed tutorial, see the deployment toolkit guide at the Sun web site.
XZXXXXXX
Certificates and Certificate Authorities
The JRE has a list of valid Certificate in the jre/lib/security directory. There is a file called cacerts where this information is contained. You can actually view this information using the Java Control Panel. There is a program called javacpl.exe (or javacpl on linux) that is in the jre/bin directory where you installed Java. If you run this program
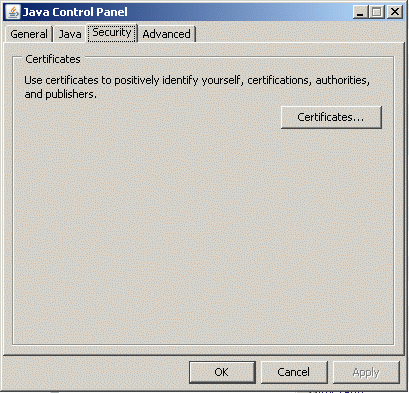
Click on Certificates...
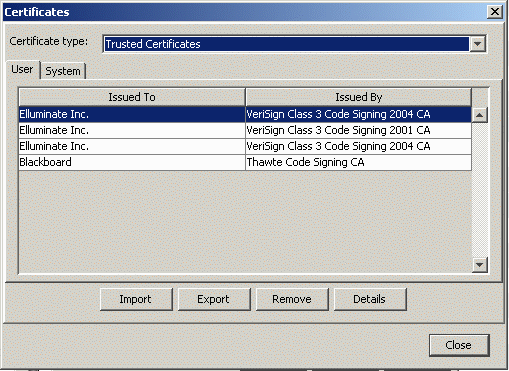
A Certificate Authority (CA) is an entity which issues digital certificates. The CA is a third party who verifies a companies digital certificate. There are many companies who offer certificates. For one list, look at the Open Directory Project list of Third Party Certificate Authorities.
Summary
So, Java Web Start lets us have the flexibility of Applets, but the power of Applications. It doesn't take much to configure, and you can do all of your development as native applications, which is much easer to test and debug than Applets. If you want to include the ability to automatically install Java if it isn't installed, you include a few scripts in your launch page and provide an automatic download page for IE users.