
Java Server Pages (JSP)
Recommended Reading
Chapter 3- JavaSever Pages from "Servlets and Java Server Pages" by Falkner and Jones.
Java Server Pages
So far, we've seen how easy it is for Servlets to
- Read form data
- Read HTTP request headers
- set HTTP status codes and response codes
- Use cookies and session tracking
- Share data among servlets
- Remember data between requests.
One thing I'm sure you've noticed is it that creating HTML output with servlets can be somewhat low level, and it tends to require somebody with Java experience to produce. In many companies, you have coders and you have web designers, and they are not the same individuals. Also, imagine how difficult it is to maintain that HTML that is generated by the Servlets.
Sun came up with the idea to use regular HTML for most of a page. You could embed Java code, in different ways, by placing special markings within the page. These are Java Server Pages (JSP). JSP pages end in the .jsp suffix, and are actually converted into Servlets by the server. Even if the page is all HTML, if it is a .jsp page, it is eventually converted into a Servlet with a bunch of println() calls. The entire JSP page gets translated into a servlet the first time it is called, and each time thereafter, it uses the generated Servlet code to service the request.
This is important, the JSP page is translated into a Servlet the first time it is called, and it is that "compiled" Servlet that is used by the Server that time and every subsequent time the JSP page is called. The Server does not generate a Servlet every time a JSP page is called. You, as a mere human, can safely observe this arcane bit of magic by creating a simple JSP page and then viewing the resulting Servlet that is generated. Where that is done is highly dependent on the environment you are in.
Use the menu in Eclipse to select File->New Project. Choose "Dynamic Web Project" for the Category of the project and "Web Application" for the Project itself. For this example I named the project "HelloWorldJSP". Choose the Tomcat 8 server, and the Java EE Version of 7.
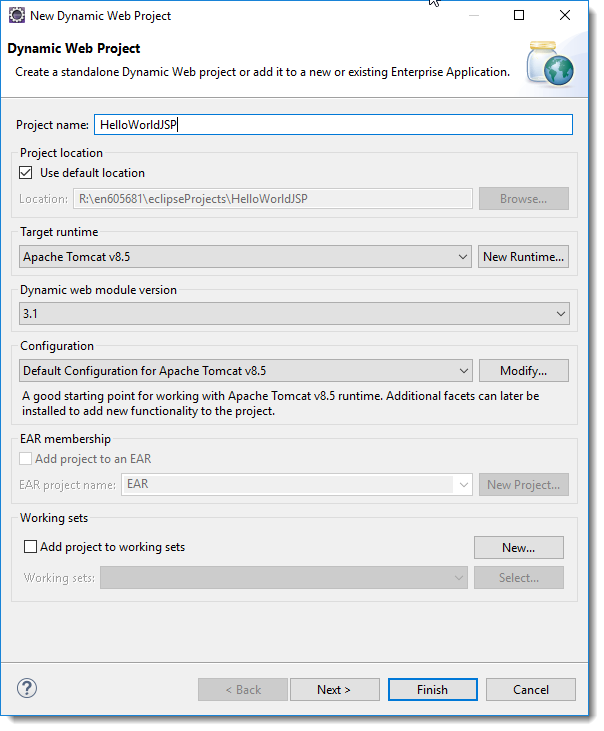
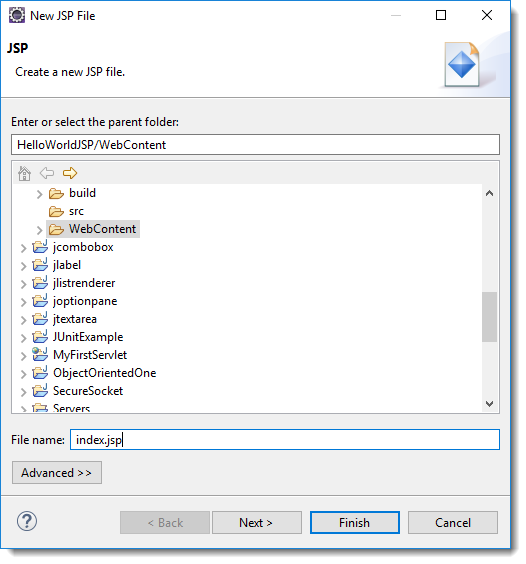
Click "Finish" on "Finish" to create the project. As usual we have a blank project. This time, instead of making a new HTML file, we want a JSP file

Go ahead and name your file index.jsp
Again, for simplicity's sake, just choose the HTML 4 markup for the JSP file
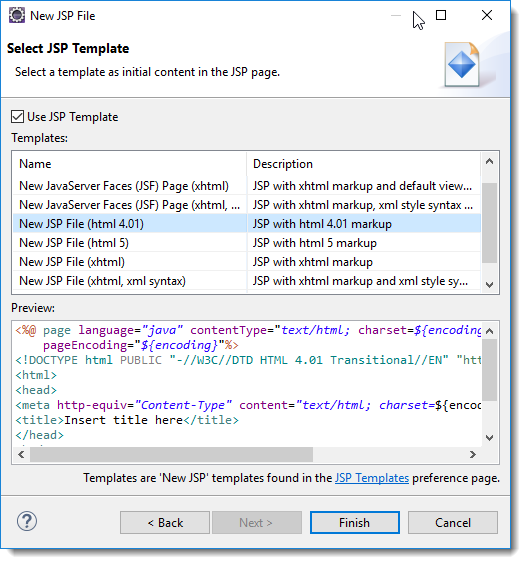
And click Finish

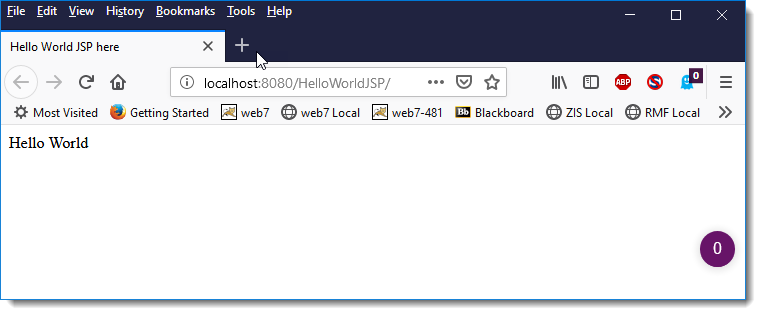
Add the classic Hello World text to the title and the body.
If you right click on the project name and select Run, you will see the Hello World actually appear in your browser. (If this is the first time you've fired something up in Eclipse, it may take a bit to start some of the support web and database servers). Don't be surprised if you are running Windows and the Windows Firewall asks you to allow the connection (you'll need to).
Very simple HTML page, if you select "View Source" in your browser menu, you would see the following
<%@ page language="java" contentType="text/html; charset=ISO-8859-1"
    pageEncoding="ISO-8859-1"%>
<!DOCTYPE html PUBLIC "-//W3C//DTD HTML 4.01 Transitional//EN" "https://www.w3.org/TR/html4/loose.dtd">
<html>
<head>
<meta http-equiv="Content-Type" content="text/html; charset=ISO-8859-1">
<title>Hello World JSP here</title>
</head>
<body>
Hello World
</body>
</html>
Okay, I'm going to leave the following in to illustrate the point, but it looks like Netbeans 7 was the last version that you could do this with. This was really cool to be able to see what happens to JSP pages.
The HTML above is what the JSP page generated.
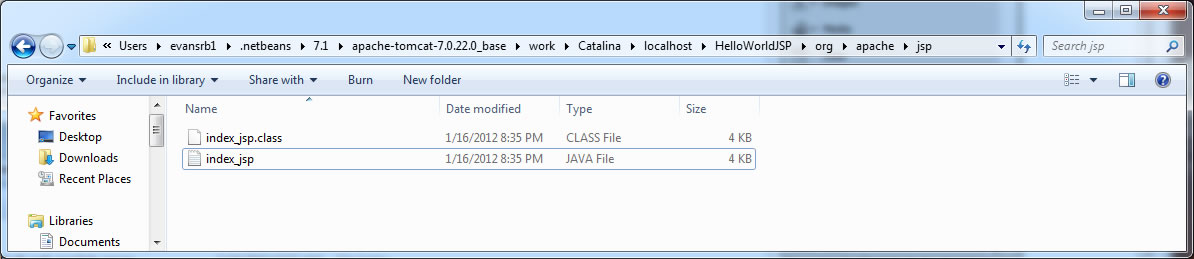
(Note the directory path in the title bar of the window). What do you know! There is a directory (I've selected it above) called HelloWorldJSP. (You won't have all the other directories, some are other projects I've used).
If you open that directory, and walk down the org\apache\jsp directories (which happens to be the default path for auto-generated servlets). You'll finally see a index_jsp.java. Open this file in an editor and take a look at it. Notice any familiar coding patterns? Looks like Servlet internals doesn't it? If you do a little digging, you can find out that the index_jsp class extends org.apache.jasper.runtime.HttpJspBase, which in turn extends HttpServlet!
Within the _jspService() method, you'll notice the following:
      out.write("<!DOCTYPE HTML PUBLIC \"-//W3C//DTD HTML 4.01 Transitional//EN\"\n");
      out.write("   \"https://www.w3.org/TR/html4/loose.dtd\">\n");
      out.write("\n");
      out.write("<html>\n");
      out.write("    <head>\n");
      out.write("        <meta http-equiv=\"Content-Type\" content=\"text/html; charset=UTF-8\">\n");
      out.write("        <title>JSP Page</title>\n");
      out.write("    </head>\n");
      out.write("    <body>\n");
      out.write("        <h2>Hello World</h2>\n");
      out.write("    </body>\n");
      out.write("</html>\n");
Which is the Servlet code that generated the HTML we saw in the browser. So, there we have our proof that JSP pages are first turned into Servlets before they are ever run by the server.
Using JSP features
There are different ways of marking up the Java code within the JSP page, depending on how you want your code "inserted" into the eventual Servlet that is created.
A sample piece of a JSP page might look something like this
Thanks for ordering <%= request.getParameter("title") %>
When called by a URL that looks like this:
https://host/OrderConfirmation.jsp?title=Day+Hikes+in+the+Beartooth+Mountains
It would get rendered to a page as "Thanks for ordering Day Hikes in the Beartooth Mountains"
Now, JPS pages can't do anything Servlets can't do, but they do make it much easier to write and maintain the HTML code (with a tool like Dreamweaver). It also lets you let your web designers take care of the HTML design, but let's the Java programmers worry about the functionality.
Remember, JSP pages just let you generate HTML in an easier fashion than using Servlets. But the bottom line is that what the browser sees is still just good old HTML. That means you can embed tags in the HTML to run applets, show images, use Acrobat or Flash just like you would with any HTML page. (Of course, you can do this in a Servlet as well).
Can you tell when sites use servlets or jsp?
Well, yes you can...usually by looking at the URL that is shown in the browser. A while ago, before the HTML 5 craze, If you went to the Ralph Lauren site, you would notice that the address shown in your browser is https://www.ralphlauren.com/home/index.jsp?direct.

So you can tell that Ralph Laruen is using JSP/Servlets to render their page. If you click on your browser to "Show Page Source" you'll see HTML with some JavaScript which was generated by the index.jsp JSP page.
JSP Constructs
Since JSP is just a way to make formatting a document easier, their are no JSP specific objects that you use. Instead, you use markup to determine how to include existing Java code, objects or resources. Remember, think of JSP as HTML with special codes to splice in Java "stuff". You need a web-server to convert the Java "stuff" to HTML, so you can't look at it like a regular HTML page though.
JSP Expressions
The simplest of the constructs is that of an expression. An expression is in the format:
<%= expression %>
The expression is basically placed as an argument to out.print(), therefore it's toString() method is called to generate the text output. It is placed into the HTML page at the place the "expression" was currently located in the JSP page.
So if you had the following in your JSP page:
Current time: <%= new java.tuil.Date() %>
Your hostname: <% = request.getRemoteHost() %>
The value of the <code>testParam</code> form parameter is <%= request.getParameter("testParam") %>
You should see the following:
Current time: Wed Nov 21 10:40:10 EST 2007
Your hostname: <the course computer>
The value of the testParam form parameter is bar
Since JSP pages are converted into Servlets by the server. The content of the page is now printed out in the generated Servlet's _jspService() method. For JSP Expressions, they are inserted into the _jspService code to be something like out.println(expression.toString());
If you put the code below in the index.jsp page of your project:
    <body>
        <h2>Simple JSP Date</h2>
        <h3><%= new java.util.Date() %></h3>
    </body>
You would see the following in the web browser...

But if you looked in the generated Servlet, you'd see the following code:
      out.write("    <body>\n");
      out.write("        <h2>Simple JSP Date</h2>\n");
      out.write("        <h3>");
      out.print( new java.util.Date() );
      out.write("\n");
      out.write("    </body>\n");
So you can see that when we say that the code is inserted into the generated servlet, it is indeed spliced right into the out.write() methods.
Pre-defined Variables
JSP pages have several pre-defined variables that you can access with expressions and scriptlets.
variable name |
content |
| request | The HttpServletRequest object |
| response | The HttpServletResponse object |
| session | The HttpSession associated with the request (unless this is disabled with the session attribute of the page directive) |
| out | The output stream used to send output to the client (This is of type JspWriter) |
| application | The ServleContext (for sharing data) as obtained as if you were calling getServletConfig().getContext() from a Servlet. |
JSP Scriptlets
The next type of construct is a JSP Scriptlet. Scriptlets are in the form
<% java code %>
or in XML-compatible syntax
<jsp:scriptlet> java code </jsp:scriptlet>
Scriptlets are inserted verbatim into the Servlet's _jspService() method, which is called by service(). Unlike expressions, the code is not passed as an argument to out.print(), instead it is inserted as is.
For example, if you modified your index.jsp page to have the following code:
    <body>
        <h2>Simple JSP Date</h2>
        <% java.util.Date foo = new java.util.Date(); %>
        <h3>Today is <%= foo %></h3>
    </body>
You would see the following ouput at your browser:

And again, looking at the generated Servlet code:
      out.write("    <body>\n");
      out.write("        <h2>Simple JSP Date</h2>\n");
      out.write("        ");
 java.util.Date foo = new java.util.Date();
      out.write("\n");
      out.write("        <h3>Today is ");
      out.print( foo );
      out.write("</h3>\n");
      out.write("    </body>\n");
You can see how the code contained in the <% %> tags is inserted as-is into the generated Servlet code. the variable foo, defined in the scriptlet, can then be used later in an expression.
Example using JSP Scriptlets
Download and open the Eclipse project ScriptletJSP. (note that the only file in the project is the index.jsp page, there is no Servlet) If you open the index.jsp page, you should see the following:
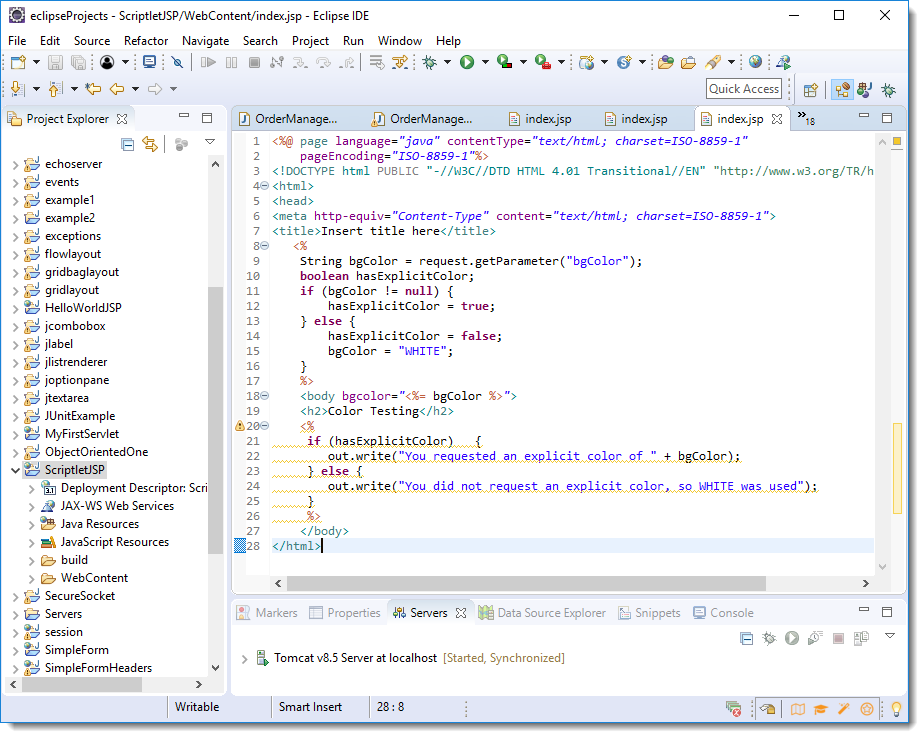
You can see the mix of scriptlet and expressions in the HTML code for the JSP page.
In this example, we want to get the value of the bgColor parameter from the URL that called the index.jsp page. If it is not set, we will use WHITE as a background color for the page, otherwise we will use the color provided.
The first scriptlet section establishes the color for the bgColor variable, based ont the HttpServletRequest object's getParameter("bgColor") value. This value is then inserted into the <body bgcolor=""> tag.
The text <% bgColor %> is replaced by the value of bgColor from the scriptlet code above.
Afterward, there is one more section of scriptlet code that customizes the output text by using the out object provided to the JSP pages.
When you run the example at first, you will see the following output:
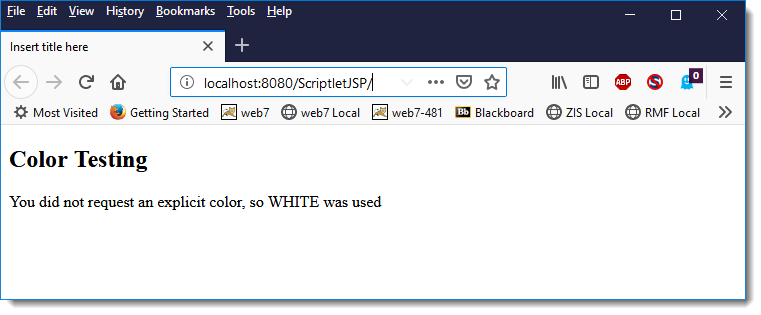
This is because you are using the default welcome page to the web application, which is index.jsp. Since no parameter is included, you get the white background.
If you go to the url text field of your browser and type:
https://localhost:8084/ScriptetJSP/index.jsp?bgColor=BLUE
You will see the following output:

Once again, looking at the generated Servlet code we see:
   out.write("<html>\n");

   out.write("    <head>\n");

   out.write("        <meta http-equiv=\"Content-Type\" content=\"text/html; charset=UTF-8\">\n");

   out.write("        <title>Scriptlet JSP</title>\n");

   out.write("    </head>\n");

   out.write("    ");


   String bgColor = request.getParameter("bgColor");

   boolean hasExplicitColor;

   if (bgColor != null) {
     hasExplicitColor = true;

   } else {

     hasExplicitColor = false;

     bgColor = "WHITE";

   }


 out.write("\n");
 out.write("    <body bgcolor=\"");
 out.print( bgColor );
 out.write("\">\n");
 out.write("    <h2>Color Testing</h2>\n");
 out.write("    ");

 if (hasExplicitColor)   {

   out.write("You requested an explicit color of " + bgColor);
 } else {

   out.write("You did not request an explicit color, so WHITE was used");

 }
 out.write("\n");

 out.write("    </body>\n");

 out.write("</html>\n");
JSP Declarations
The last type of scripting element is a declaration. If you look at the two categories above, the first is passed as an argument to out.print(), the second is inserted into the sequence of out.write()/print() calls, and this last category is inserted into the body of the Servlet outside of any existing methods.
The format of a JSP Declaration is:
<%! Java Code %>
or the XML-compatible
<jsp:declaration>Java Code</jsp:declaration>
You can use declarations to define methods or variables used within the servlet class. Some examples would be:
<%! private String bgColor %>
Download and open the Eclipse project DeclarationJSP. In this application, I've modified the last example to move some of the code out of the body of the HTML and use some declarations instead.
<%! String bgColor="WHITE"; %>
<%! boolean hasExplicitColor = false; %>
<%! int accessCount = 0; %>
<html>
<head>
<meta http-equiv="Content-Type" content="text/html; charset=ISO-8859-1">
<title>Declaration JSP</title>
</head>
<%
   accessCount++;
 String newBgColor = request.getParameter("bgColor");
   if (newBgColor != null) {
   bgColor = newBgColor;
   hasExplicitColor = true;
   }
   %>
<body bgcolor="<%= bgColor %>">
<h2>Color Testing</h2>
<%
   if (hasExplicitColor)   {
   out.write("You requested an explicit color of " + bgColor);
   } else {
   out.write("You did not request an explicit color, so WHITE was used\n");
   }
   out.write("<br>");
   out.write("You have visited this page " +
   accessCount +
   " times since the last server reboot");
   %>
</body>
With the code above, you get the same functionality of being able to choose the background color as with the earlier example, but the page now keeps track of how many times it has been visited (loaded) since the server rebooted (or a new jsp page was defined). I'll leave it to you to track down the generated Servlet code this time.
The JSP Page Directive
The JSP constructs let us insert working code into the Servlet, but there is another type of information that may be needed in a Servlet's definition. This final type is the JSP Page Directive. It's purpose is to give high-level information about the Servlet that will result from the JSP page.
This information can provide guidance on:
- Which classes are imported (import java.sql.... types of statements)
- Which class the servlet extends
- What MIME type is generated
- How multithreading is handled
- If the servlet participates in sessions
- The size and behavior of the output buffer
- What page handles unexpected errors.
Page directives are in the form of
<%@ page directive %>
The JSP Page Import Attribute
This Page Directive is designed to generate import statements at the top of a Servlet class definition.
<%@ page import="package.class" %>
So to import the java.util.Date class you would have
<%@ page import="java.util.Date" %>
Remember, any classes that you have created must be located in the WEB-INF/classes directory that is in your web application directory, or in a jar file in the lib directory.
Download and open the Eclipse project ImportJSP. In this example I'll first make a truly impressive Java class called SuperMath which multiplies two numbers!
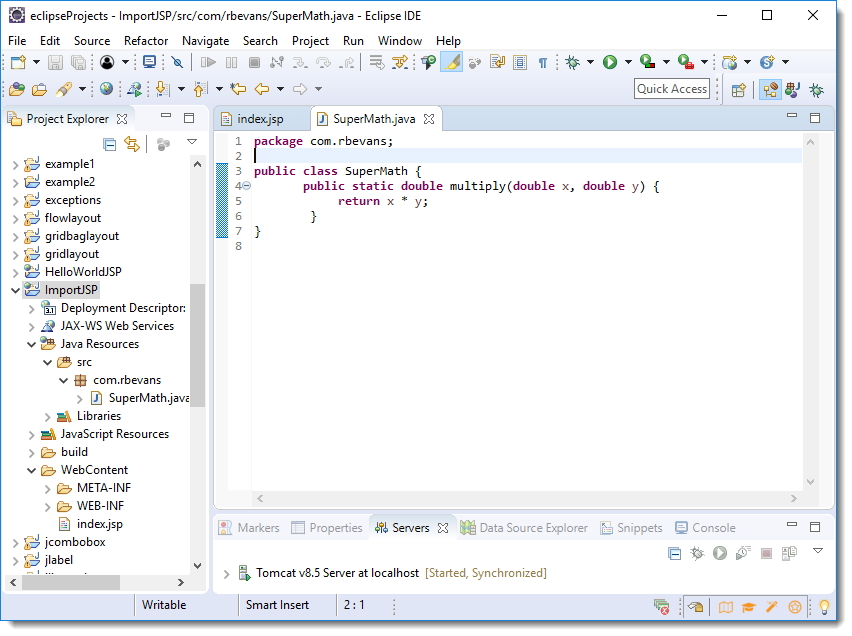
Then I'll use that class in my JSP page.
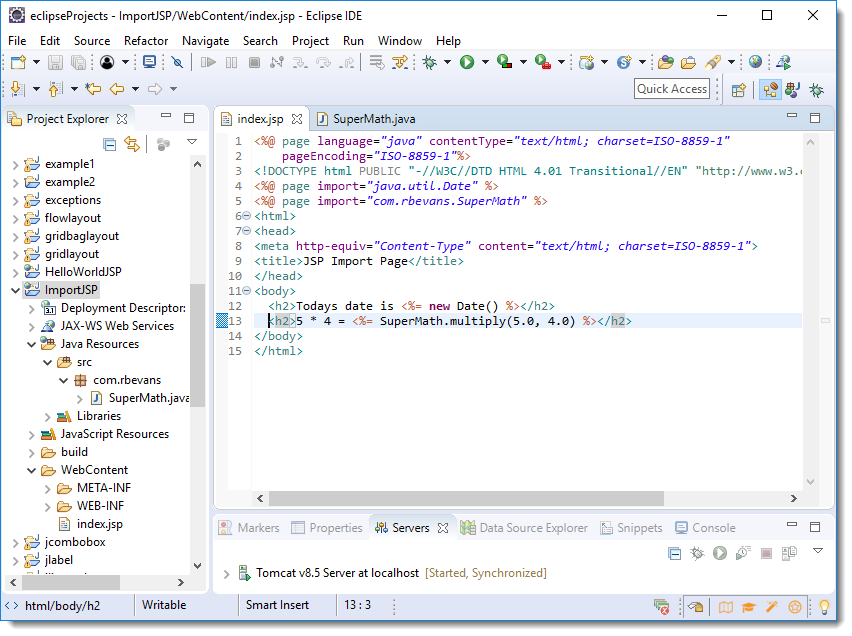
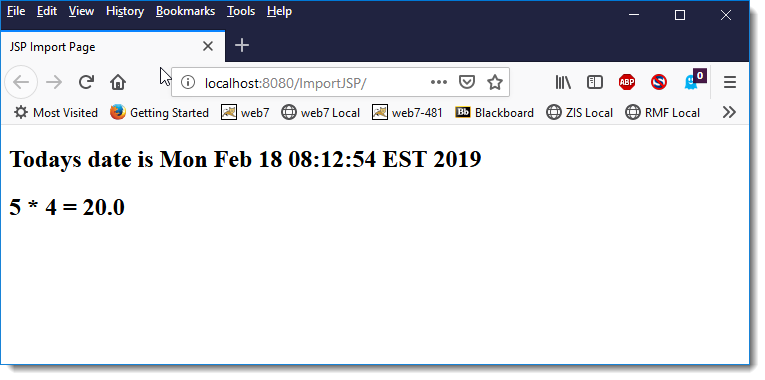
Note that in this example, the index.jsp page has two import directives, and then no longer has to preface the new Date() call with the java.util package. In addition, I can use the SuperMath class I defined. As a different item, note that in the above screenshot I'm showing the Files view of the project after it has been built. Notice that the SuperMath.class file is located in the WEB-INF directory under the build directory.
When you run the example, you'll see the page below...
The contentType Attribute
The typical content type is "text/html" for most of your web pages, but you can change it to be something else. If you look at the default JSP pages made by Eclipse, the contentType attribute is already set at the top of the page:
<%@page contentType="text/html" pageEncoding="UTF-8"%>
If you made the content of index.jsp the following:
<%@page contentType="application/vnd.ms-excel" %>

   First	Last	Company

   Bob	Evans	JHU/APL

   Tom	Smith	JHU/APL

   Doug	Piranha	MontyPython

   Kasumi	Tendo	 Ranma1/2
When you ran this in your web server and visited the page, it would open the data in Excel. Note that there are TABS between the data above.
The isThreadSafe Attribute
The isThreadSafe page directive is used to tell the system when your code is NOT thread safe, so that the system can prevent concurrent access. It instructs the Servlet to implement the SingleThreadModel.
Normally the system assumes you have synchronized updates to fields and other shared data in an object. If you set this value to false:
<%@ page isThreadSafe="false" %>
It will ensure no concurrent access to the page, but will probably degrade performance under any type of load.
Not Thread Safe |
Thread Safe |
<%! private int idNum = 0; %>

<%

String userID = "userID" + idNum;

out.println("Your ID is " + userID + ".");

idNum = idNum + 1;

%> |
<%! private int idNum = 0; %>

<%

synchronized(this) {

 String userID = "userID" + idNum;

 out.println("Your ID is " + userID + ".");

 idNum = idNum + 1;

}

%> |
Predefined Attributes for use with JSP Page Directives
In addition to the directives listed above, there are several other attributes you can set with Page Directives. These are often not used, but are good to know, just in case...
| Attribute | Use |
| session | Lets you choose not to participate in sessions |
| buffer | Changes the minimum size of the buffer used by the JspWriter (out) |
| autoflush | If true, requires developer to explicitly flush buffer |
| extends | Changes the parent class of the generated servlet |
| isErrorPage | Stipulates that the page can be used as an error page |
| errorPage | Designates a page to handle unplanned errors |
Including Files in JSP Documents
Since the idea of JSP pages is to make output easer for Servlet based application, they have also included the ability to re-use some JSP content in multiple pages (almost like substituting in a variable).
Basically, if you have the statement:
<%@ include file="Relative URL" %>
It will take the contents of the file specified and insert that into the JSP page that the directive is located in. This is often used with header/footer code for a web site. You define the header content in one JSP page, then import it in all of the others. That way when you company is purchased by Microsoft or Oracle, all you have to change is your company name once in the header and all of your pages reflect the changes.
Servers are not required to detect changes to the included file, and in practice, many don't. This means that you need to change (or at least touch) the JSP files that contain the directive so that the server will know to re-compile the JSP pages.
Download and open the Eclipse project IncludedJSP. Take a look at the ContactInfo.jsp file. Notice anything different about this file? This is not a standalone HTML page like we've seen so far. Notice the lack of the normal <html> and <body> tags. This is, of course, because this file is meant to be included into another JSP page that does define these attributes.
<%@page language="java" contentType="text/html; charset=ISO-8859-1"%>
<%@page import="java.util.Date" %>
<!DOCTYPE HTML PUBLIC "-//W3C//DTD HTML 4.01 Transitional//EN"
"https://www.w3.org/TR/html4/loose.dtd">
<%!
   private int accessCount = 0;
   private Date accessDate = new Date();
   private String accessHost = "<i>No previous access</i>";
   %>
<p> <hr /> <img src="smallduke.gif"> This page ©2019 by Robert Evans. This page has been accessed <%= ++accessCount %> times since the last server reboot. It was last accessed from <%= accessHost %> at <%= accessDate %>.
<% accessHost = request.getRemoteHost(); %>
<% accessDate = new Date(); %>
When you run this example, you'll see the following:
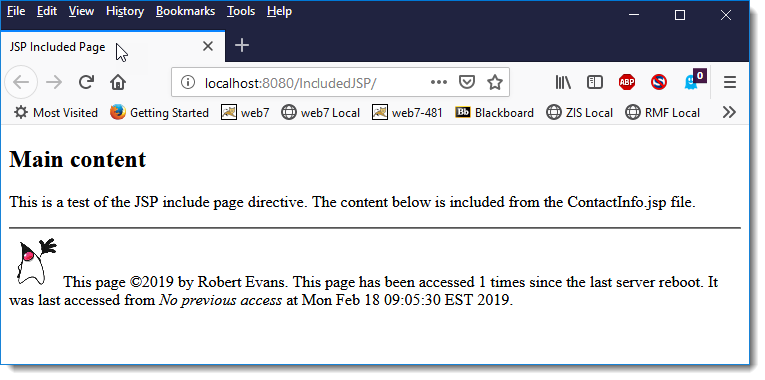
Try refreshing the page and watching the results in the footer.
Including Pages at Request Time
I just mentioned that included pages weren't normally recompiles when they were changed. That is because they are included during the compilation process, which lets them run faster than if they were included at request time. You have the option, however, of using a slightly different form of the include directive that will include pages at run time. This allows updated to the included content without changing or refreshing the main JSP pages.
To include pages at request time, use the directive:
<jsp:include page="Relative URL" flush=true" />
Why the two times of includes? Well, the example I gave above shows how relatively static content could be included in files. What if you wanted to include pages that change often, and don't want to have to re-touch all of your JSP source pages. You could include something like news headlines by doing the following.
Here are the latest news items:
<ol>
  <li><jsp:include page="news/Item1.html" flush="true /></li>
  <li><jsp:include page="news/Item2.html" flush="true /></li>
  <li><jsp:include page="news/Item3.html" flush="true /></li>
</ol>
This would include the html files and any changes, even if the JSP page wasn't recompiled.
Using JavaBeans Components with JSP
If you look at JSP pages as an effort to try to make authoring the HTML easier, and take away the requirement for the HTML designer to be familiar with Java, then the next thing we're going to look at makes sense.
Rather than inserting raw code, JSP pages can use Java Beans objects. Java Beans are simply regular Java classes that adhere to certain coding conventions. This enables JSP pages, IDEs or other applications to use them as data objects without having to directly use them as Java objects.
JSP 2.0 introduced something called the JSP Expression Language, or JSP EL. The idea was that for a Model-View-Controller (MVC) architecture, beans are used to move data around between pages. To access the beans, you use do have to do a little more coding, but with the JSP EL you have a shorthand syntax that makes it "cleaner" to access the beans that you use.
Java Beans have the following conventions:
- They must have a zero-argument (empty) constructor
- They should have no public instance variables (fields)
- All persistent values should be accessed through standard named methods (getters and setters).
- For every attribute (variable) with a given name (for example foo).
- There is a setFoo() method
- There is a getFoo() method (or isFoo() for boolean objects)
- For our private int foo variable
- public void setFoo(int newValue)
- public int getFoo()
- For every attribute (variable) with a given name (for example foo).
So, if we wanted to make a Java Bean called Address.
package com.rbevans;

public class Address {

   private String street;

   private String city;

   private String state;

   private String zip;
 public String getStreet() {

   return street;

   }
 public void setStreet(String street) {

   this.street = street;

   }
 public String getCity() {

   return city;

   }
 public void setCity(String city) {

   this.city = city;

   }
 public String getState() {

   return state;

   }
 public void setState(String state) {

   this.state = state;

   }
 public String getZip() {

   return zip;

   }
 public void setZip(String zip) {

   this.zip = zip;

   }
}
Using Java Beans
If we wanted to use this bean in our JSP pages, we could use the useBean directive:
<jsp:useBean id="arbitrary name" class="fully qualified package and class name" />
which for our bean above would be:
<jsp:useBean id="address" class="com.rbevans.Address" />
This allows us to instantiate and use Java classes without explicitly using Java syntax. The code above is interpreted (and used in your Servlet) as if you had written:
<% com.rbevans.Address address = new com.rbevans.Address(); %>
So why do we use the useBean annotation? Because it simplifies setting fields based on incoming request parameters and it makes it easer to share and use beans with other applications. But just as important, it lets non-Java programmers access Java objects without having to know Java!
You can then access the bean within the JSP code by using the following type of statement:
<jsp:getProperty name="arbitrary name" property="variable (attribute) name" />
which for our example, would look like
<jsp:getProperty name="address" property="city"/>
If your server supports JSP 2.0 (ours does), you can use a much simpler form. Instead of using the jsp:useBean statement AND the jsp:getProperty statement, you can just use:
${address.city}
Of course there must be a getCity() method in the Address class for this to work. Notice how the "city" tag is changed to getCity().
This is equivalent to you writing
<%= address.getCity() %>
Setting Java Beans
To set a property value you would use
<jsp:setProperty name="arbitrary name" property="variable (attribute) name" value="new value"/>
which for our example, would look like
<jsp:getProperty name="address" property="city" value="Laurel"/>
Again, this is equivalent to you writing
<%= address.setCity("Laurel") %>
Associating Java Beans with Request (Form) Parameters
If you want to load Beans from form parameters, there are several ways of doing so. The first, and less elegant, way is do brute force the setting.
<jsp:setProperty ... value='<%= request.getParameter("...") %>' />
This gets the value from the Request object and sets the Bean property. Note that this code sequence assumes the parameter is a String, if it isn't you'll have to convert it to the proper type first.
The second way is to use the "param" attribute of the jsp:setProperty tag. Instead of the more complex code shown above, the param tag is shorthand for the <%= request.getParameter("...") %> code. In this form you use:
<jsp:setProperty name="..." property="..." param="..." />
The param value matches the form "name" value. It automatically gets the value from the request object and loads it into the bean.
Download and open the Eclipse project BeanJSP. This examples uses the "param" method of loading a Bean from form values. You may notice that I went a little crazy with formatting in this example. Formatting has always been an interesting issue in HTML. Many people use tables to align elements in an output (it probably would have been easier than the way I did it). In this case, I wanted to play with CSS to see if I could "prettify" the input window.
One thing to note. If you don't download the project, but decide to create things on your own, Eclipse will complain about the referenced class not being found in the JSP page (it will be underlined in red)
You need to edit the properties on the project and include the <project>WebContent/WEB-INF path to your classpath to clear this warning message

The CSS styles included in index.jsp produce the following input window
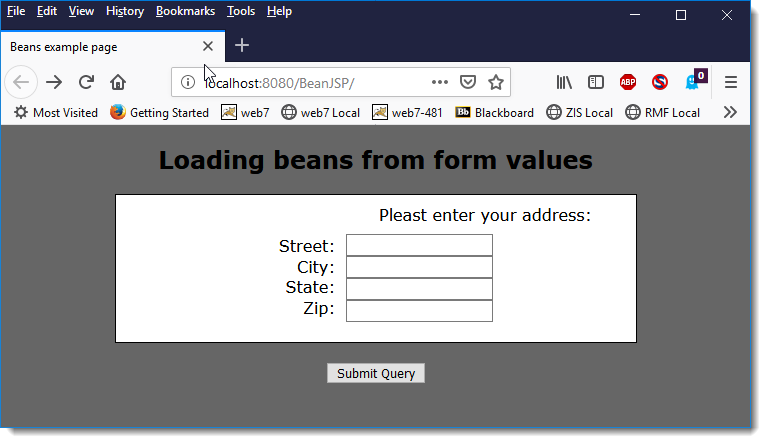
If you enter data...
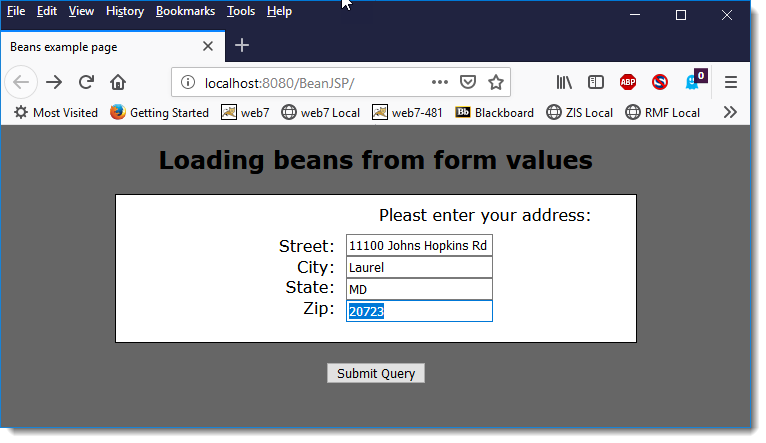
And press Submit Query, the code in the submit.jsp file:
<jsp:useBean id="address" class="com.rbevans.Address" />
<jsp:setProperty
name="address"
property="street"
param="street" />
<jsp:setProperty
name="address"
property="city"
param="city" />
<jsp:setProperty
name="address"
property="state"
param="state" />
<jsp:setProperty
name="address"
property="zip"
param="zip" />
<html>
<head>
<meta http-equiv="Content-Type" content="text/html; charset=UTF-8">
<title>Thanks!</title>
</head>
<body>
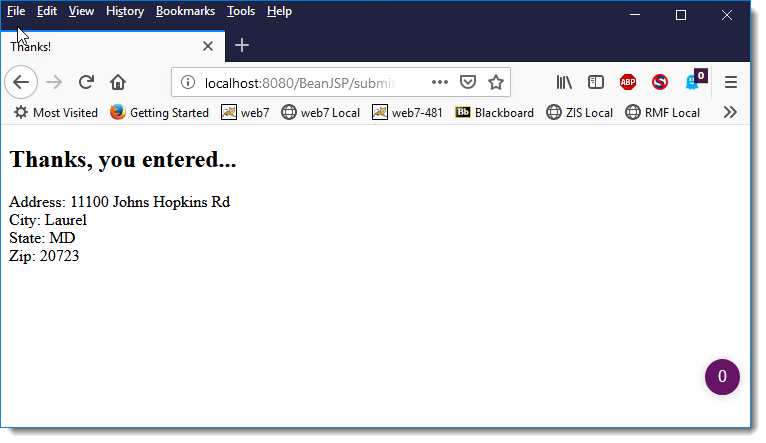
<h2>Thanks, you entered...</h2>
Address: <jsp:getProperty name="address" property="street" /> <br />
City: <jsp:getProperty name="address" property="city" /> <br />
State: <jsp:getProperty name="address" property="state" /> <br />
Zip: <jsp:getProperty name="address" property="zip" /> <br />
</body>
</html>
Uses the class Address (found in the Source Packages directory of the project) as a Bean and first loads the form data into the bean and then uses it in the output.
It turns out you can associate all of the properties in a page with Input parameters with a special format:
<jsp:useBean id="arbitrary name" class="package.beanName" />
<jsp:setProperty name="arbitrary name" property="*" />
Download and open the Eclipse project BeanJSPv2 to see this variation. The only difference is in the submit.jsp file. In this example I use the property="*" way of setting the Bean values from the form names.
Beans and Scope
We covered Beans and Object Scope in the Servlet lecture, but let's see how they are used in JSP pages. When you use a bean with the <jsp:useBean...> tag, one of the attributes that you can specify is the scope option:
<jsp:useBean id="..." class="..." scope="..." />
This places the bean in the appropriate scope context to be used by other Servlets/JSPs in the web application (or Session or Request depending...) As we discussed previously, this lets multiple web components share data to the extent they desire. As you recall, there are four Object Scopes.
- page
- application (web context)
- session
- request
If you don't specify a scope value in the <jsp:useBean...> tag, "page" scope is used, which keeps the bean local to the page it is used on.
JSP Beans result in a new bean being created only if no Bean with the same id and scope can be found. Think about this statement, this means that even if you use the correct label and class for a Bean, if you don't use the same scope, it won't access the other Bean value. Effectively, what you are doing when you use a <jsp:useBean> statement is inserting a variable with a name from the "id=" part of the useBean statement. You can make as many of these as you want as long as they are uniquely named. The scope attribute controls visibility of this variable between pages of your web application.
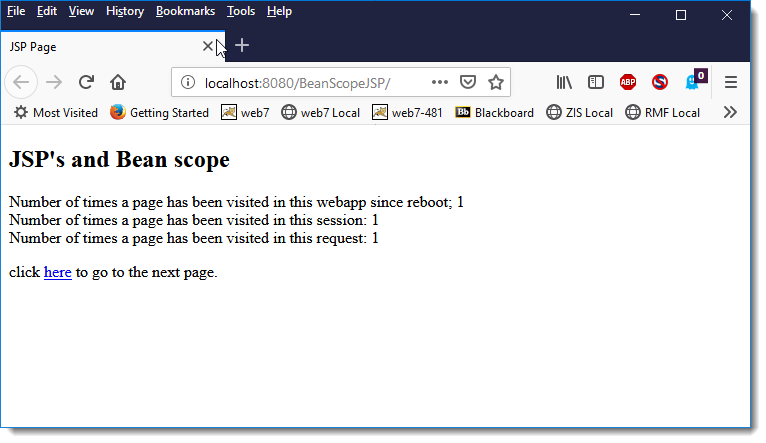
Download and open the Eclipse project BeanScopeJSP. In this example I show how to set up several scopes of the same Bean and use them in a JSP page.
Take a look at this code from index.jsp:
        <jsp:useBean id="contextCounter" class="com.rbevans.Counter" scope="application" />
        <jsp:useBean id="sessionCounter" class="com.rbevans.Counter" scope="session" />
        <jsp:useBean id="requestCounter" class="com.rbevans.Counter" scope="request" />
        <jsp:setProperty name="contextCounter" property="incrementNumTimesVisited" value="1" />
        <jsp:scriptlet>sessionCounter.setNumTimesVisited(sessionCounter.getNumTimesVisited() + 1);</jsp:scriptlet>
        <jsp:setProperty name="requestCounter" property="incrementNumTimesVisited" value="1" />
I define 3 bean id's, all using the Counter object defined in the application. The Counter values are initialized with 0, so I need to initially increment the values. There are two ways of doing something like this, the recommended way is to establish a bean property that will execute the code you want. In this case, I have an additional bean property "incrementNumTimesVisited" which will add whatever value is passed to it to the counter value. To show the alternative (which is inserting more Java code into the jsp page...a bad thing), is to use the sessionCounter variable directly using a scriptlet,
When you run the application, you'll initially see the following:
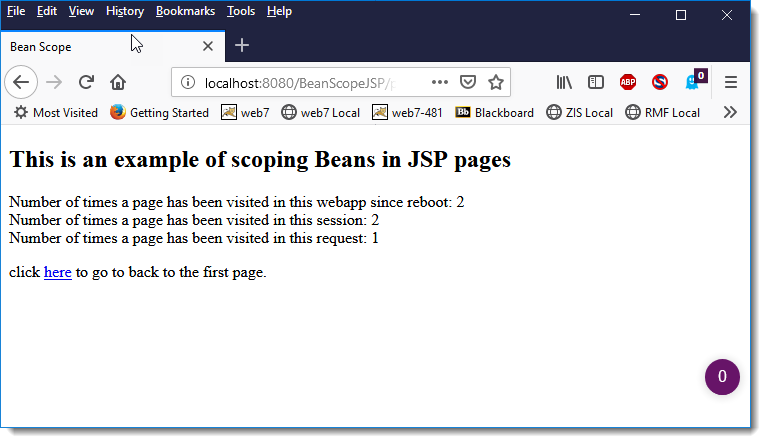
If you go to the second page, you'll see...
Copy the URL from the browser, and then exit the browser. Restart your browser and paste the URL back into it.
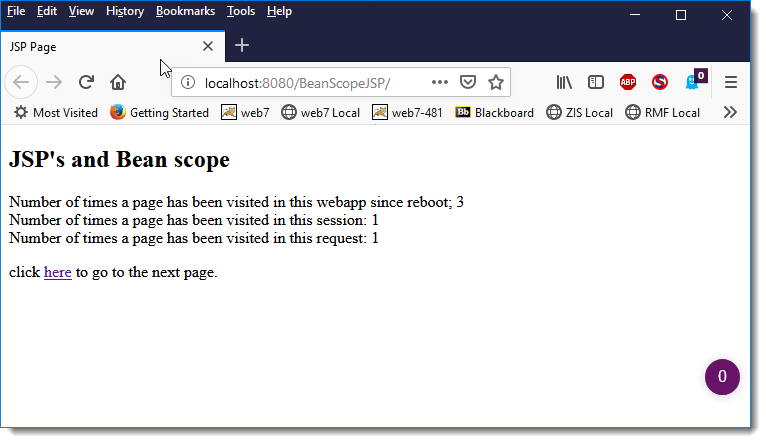
Think about the results that you see. The application context will always increment across anybody accessing any page in the app. The session context keeps track of your current session, and the request context shows 1 each time. In what conditions would it not be 1?
JSP 2.0
JSP 2.0, which is now widely available, adds quite a few convenient features. Included in JSP 2.0 is the JSP Expression Language (EL). The EL is a language inspired by JavaScript. The EL was in answer to the awkward use of the jsp:useBean/jsp:getProperty syntax in early versions of JSP. The goal of the EL was more concise access, the ability to access sub properties, and to make it just plain old simpler to use.
To use JSP 2.0 EL, you need to use the JSP 2.0 web.xml file.
<?xml version="1.0" encoding="ISO-8859-1"?>

   <web-app xmlns="https://java.sun.com/xml/ns/j2ee"

   xmlns:xsi="https://www.w3.org/2001/XMLSchema-instance"

   xsi:schemaLocation=

   "https://java.sun.com/xml/ns/j2ee web-app_2_4.xsd"

   version="2.4">

   …

 </web-app>
First, there a several implicit variables that you can access.
Variable name |
Function |
| pageContext | the PageContext Object |
| pageScope | a java.util.Map object that maps page-scoped attribute names to their values |
| requestScope | a java.util.Map object that maps request-scoped attribute names to their values |
| sessionScope | a java.util.Map object that maps session-scoped attribute names to their values |
| applicationScope | a java.util.Map object that maps application-scoped attribute names to their values |
| param | a java.util.Map object that maps parameter names to a single String param value |
| paramValues | a java.util.Map object that maps parameter names to a String[] array param value |
| header | a java.util.Map object which maps header names to a single String header value |
| headerValues | a java.util.Map object which maps header names to a String[] array of all values |
| initParam | a java.util.Map object which maps context initialization parameter names to their String param values |
| cookie | maps cookie names to a single Cookie object |
So, for example, you could use the JSP 2.0 Expression Language to get a the "foo" parameter value by using
${param.foo}
${param["foo"]}
You can get the "host" value from the header with
${header.host}
${header["host"]}
There are several operators that are common to Java and JavaScript in EL. They include
| Operator | Function |
| . | Access a bean property or Map entry |
| [] | Access an array or List element |
| () | Evaluate internal expression first (standard use of parens) |
| ? : | Java Tertiary operator, condition ? ifTrue : ifFalse |
| +, -, *, / | Standard arithmetic functions |
| % or mod | mod |
| == or eq | Test equality |
| != or ne | Not equal |
| < or lt | Less than |
| <= or le | Less than or equal |
| > or gt | Greater than |
| >= ge | Greater than or equal |
| && or and | logical AND |
| || or or | logical OR |
| ! or not | Negate boolean |
| empty | Tests for an empty variable (bound to null, empty string or empty array, Map or Collection) |
| fn(args) | Function call |
Remember, with EL, you can "chain" object access, so if foo contains a bar object which in turn contains a baz value, you can access the baz value by:
${foo.bar.baz}