ReSTFul Web Services
Recommended Reading
- Dr. Dobbs Tutorial
- Java EE 6 Tutorial
- TutorialsPoint
- Good Overview On JavaWorld
- REST with Java (JAX-RS) using Jersey Tutorial
Web Services
Introduction
The idea of web services was really an evolution of things like RMI, JINI, DCOM and CORBA, which tried to allow distributed programming between computers. These technologies worked, but each had their own set of liabilities that prevented widespread adoption. (Actually CORBA was somewhat widespread, but it was so difficult to use and license that it never really caught on).
The original push was to develop an interface that was platform independent, modular and self-describing. Self describing means that a user of the web services doesn't know anything about the implementation when they want to use the web service, they let the web services tell them how it is used.
An effort to satisfy the initial goals mentioned above using the prevalent technologies of the time (XML and HTTP) through the development of WS-* (Web Services stack). It was comprised of several technologies for capalities like communication standards, security, discovery and more. Those technologies include Simple Object Access Protocol (SOAP) which was used for packaging service calls and responses, Web Service Definition Language (WSDL) for defining the web service methods for clients and Universal Description Discovery and Integration Service (UDDI) to facilitate the investigation and discovery of web services by remote clients.
For several reasons, SOAP based web services never took off as originally planned. Included in those reasons are a loss in popularity in storing data as XML (replaced with JSON objects) the complexity of SOAP and WSDLs and the diminishing "requirement" to have discoverable services. Because of this, we will introduce SOAP but not cover it in depth and examples.
Instead, we will cover Representational State Transfer (ReST) that has supplanted SOAP as the popular architecture for Web Servcies.
Web Services Interoperability (WS-I)
The Web Service Interoperability Organization was responsible for harnessing technologies and developing standards and profiles to support the development of web services that were interoperable across the internet. They were tasked with developing "Profiles", guidelines and standards that would ensure compatibility between services. The Basic Profile provides a non-proprietary specifications for developing web services that promote interoperability. Included in that Basic Profile are Simple Object Access Protocol (SOAP) and Web Services Description Language (WSDL) and how they utilize/interact with technologies like XML and HTTP. Beyond the Basic Profile are others that cover Security with Security Assertion Markup Language (SAML), Reliability, Encryption and more. It should be noted that it appears that nothing new has been updated/maintained on the WS-I website since roughly 2010.
SOAP
SOAP is a technology that was developed for passing XML-encoded data over HTTP to provide the means for remote procedure calls and responses to/from web services. The primary component of a SOAP document is an envelope that contains a Body that encapsulates the data being transmitted (request or response), a Header block that contains processing directives and a binding to the SOAP protocol. The SOAP envelope for a web service requests is built by a client which then issues an HTTP request with the envelope attached as content. The HTTP response that is received is formatted as a SOAP response which is then parsed by the client to retrieve results and errors from the original call.
Ultimately SOAP added another layer of work for both the client and server to package and parse a defined structure for the information contained within. As you will see shortly, ReST services and JSON alleviated the level of complexity involved with the packaging and parsing of SOAP envelopes.
WSDL
WSDL is an XML formatted "language" used for describing a set of service endpoints that operate on messages with either document or procedure oriented data. Included in a WSDL are abstract definitions of the operations and messages expected by those operations along with the actual concrete bindings to formats and protocols (e.g., HTTP GET/POST, MIME). In total, the two aspects fully defines service endpoints. Tools were available to generate the service frameworks from the WSDLs, so an initial definition of a web service environment could be focused in the WSDL. The developer would then code out the resulting stubs in the generated framework.
Ultimately a consensus in the web service community determined that the benefits of WSDL were debatable and those defended were not worth the cost of the additional complexity.
UDDI
Universal Description, Discovery and Integraton defines a standard set of methods to store and look up information about web service applications (local and remote). It provides for finding specific kinds of services or getting information about the services hosted by specific organizations. Unlike SOAP and WSDL, UDDI is not required for the deployment of services.
Overview of ReST
Though initially accepted when introduced, WS-I web services never really gained traction because of the additional overhead it placed on the development and deployment of business logic as services. The need to be knowledgable about several different protocols and formats was also a deterrent to widespread use. Having said that, the idea of technology agnostic producers and consumers was still attractive and lead to the acceptance of Representational State Transfer (ReST or REST) Web Services.
ReST services are an architectural style that doesn't only use HTTP as a transport protocol, but actually maps features of HTTP directly to the architecture to abstract method calls, serialized data and meta information. It was introduced in 2000 by Roy Fielding in his dissertation. The "architectural style" is similar to SOAP (Simple Object Access Protocol) services, but ReST rides directly on the protocol (typically HTTP) using characteristics of the protocol itself to abstract calls, data, meta information. As a result it is more "lightweight" than SOAP since there is no need to wrap or parse content in special xml messages (envelopes). In addition there are no WSDL (Web Service Definition Language) documents in ReST either which reduces overhead but also eliminates the opportunity to have others "discover" remote services.
ReST Details
In a ReSTful architecture all of the service methods and data is considered to be a "resource" and every resource is represented by a unique Uniform Resource Indentifier (URI) that is accesible on a network. The URI's components are used to find the location of a service (host and port) as well as the methods associated with a service endpoint (given in the path component). Data definitions and parameters can also be specified in the path or query parameters that can be part of a URI. The scheme in the URI describes the protocol over which the service can be accessed (most often, but not always http). If you are not familiar with URIs or their components, a good description can be found on Wikipedia.
ReSTful resources are manipulated through create, read, update, delete (CRDUD) operations that are mapped to the protocol. In the case of HTTP, these methods are mapped to the common HTTP methods PUT, GET, POST, and DELETE. A service that creates a resource will be called via an HTTP request with the POST method. Requests with the DELETE methods are used to delete resources. PUT requests are used to update existing resources and the GET method is used for accessing (or reading) resources.
Resources are decoupled from their representation so that their content can be accessed in a variety of formats, such as HTML, XML, plain text, PDF, JPEG, JSON, and others. Metadata about the resource is available and used, for example, to control caching, detect transmission errors, negotiate the appropriate representation format, and perform authentication or access control. If using HTTP, that meta-data is packaged in the request and response headers. For example the type of content is ecapsulated in the HTTP Content-Type header and is represented as a mime type (text/html or application/json).
In a ReSTful architecture all interactions between the clients and services should not have any state dependencies. That means that every service requests should be self-contained and not be dependent upon oterh requests. For example, a user of an online shopping sites ReSTFul services must provide their identity with each request. There are several ways to accomplish this such as URI rewriting, cookies, and hidden form fields. State can be embedded in response messages and passed back to the client to be embeded in future requests for valid future states of the interaction
ReSTful services are also "idempotent". That means, for any operation (service call), clients can make the same call over and over but the result on the server will always be the same. Having said that the actual response to the client (or resource state) can change. This should be more obvious as we apply the concept to the CRUD operations. In the case of POST, after being created the first time, resulting in a new resource on the server, subsequent POSTs with the same URI (creates) will only result in the same object on the server, though the response may differ in its status code. Likewise, an update (PUT) with a specific URI that specifies the fields to update should always result in the same object state on the server (aka always updating the same fields to the same values). In the case of DELETE, once deleted the resources will no longer be on the server. Subsequent deletes will not change that fact, however the response (as with create) may differ as after the first DELETE the status code returned would be 200 (OK) and in subsequent DELETE operations it would be a 204 (No Content).
ReST and Java
Java provides support for developing ReSTful services and clients through the JAX-RS 2.0 API (JSR 370) which uses a combination of methods and annotations to associate java methods and classes with ReSTful services and resources.
The Java EE provides the API for JAX-RS, the reference implementation of the specification has been developed in the Jersey Framework, an open source, production quality framework for developing ReSTful web services in Java. It is NOT included with the Java SDK or EE, but will be used in the example projects throughout this lecture.
Despite the fact that Jersey is one of the most popular ReST libraries used for Java (and for this class), there are others worth exploring as well. The following list provides just a few other options:
- Apache CXF
- JBoss RESTEasy
- Restlet - commercial
- Spring Framework
At it's core, Jersey is built around a servlet that provides the interface for HTTP and extends that API into the ReST services domain, providing capability to further map the HTTP protocol and URI content into java methods, parameters, and behaviors. This can be accomplished through external configuration files (e.g., web.xml and others) or through annotations defined by the JAX-RS specification.
Using Eclipse, as we have for most of this class, there are several ways to build a ReSTful web service. If you follow some of the tutorials you will see ways to build services from Entity Classes, Patterns, or Database. We will start with a more basic step by step implementation of a basic ReSTful service and then build on that.
Building A Java Based ReSTFul Web Service Using Eclipse
Getting Jersey ReST Framework
Unfortunately Eclipse does not provide the Jersey (or any other ReST library) on install, it is necessary to download the necessary libraries (similar to downloading the MySql jdbc connector earlier in the class).
As mentioned above, the Jersey Framework will be used for the class's ReST service material. If you go to the Jersey Framework Home Page as shown below, you merely need to click on the download link on the bottom right of the page.
Now, as all things J2EE go, you have to keep track of which version you are using, and get the appropriate libraries for that version. Jersey 2.3x was for Tomcat 8.5/9, but if you use Tomcat 10 you MUST use Jersey 3.x. This is because they have updated all of the J2EE package names from javax to jakarta. If you try to use the 2.3x version, it will just silently fail with no error messages given.

Once on the download page, just use the appropriate link for the latest (closest to the top of the page) Jersey Jax-RS RI (Reference Implementation) Bundle. In the illustration below it's version 3.1.3 for Tomcat 10.
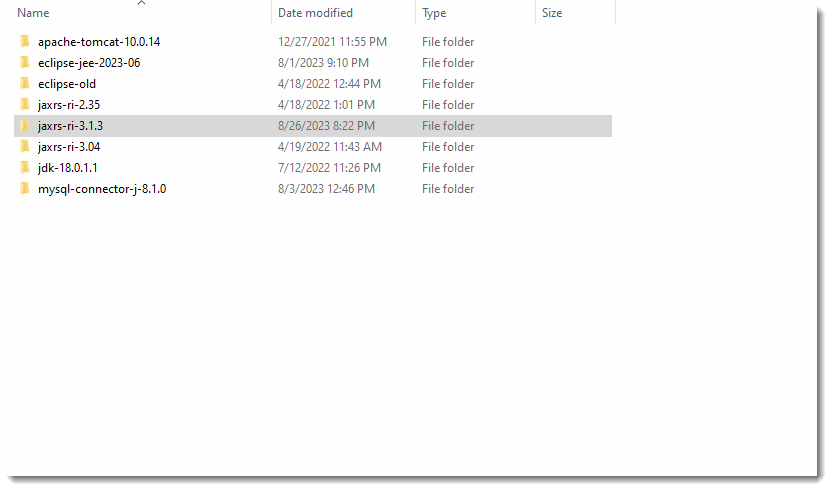
Once downloaded just extract the contents of the zip file (jaxrs-ri folder) to an arbitrary location. As shown below, there are three subdirectories (api, ext and lib) in the extracted folder. Each contains jar files that will ultimately be used in the projects to access the Jersey Framework API.
One final note before leaving the Jersey Home Page. The API documentation for the Jersey Framework is also accesible from there. Note that the latest version at this date was 3.0.0, even though the current version is 3.1.3.
Building a Service Endpoint
In this section we will build a first service endpoint in Eclipse and explore the details in order to get a more thorough understanding of the underlying technologies.
IDEs like Eclipse provide shortcuts for building and deploying ReSTful Web Services. If you wish to supplement this lecture, you can follow a basic tutorial here. In more advanced courses and work environments you would be better served to build your service (and all your code for that matter) without the support of any IDE, opting for a transportable build tool like Ant or Maven. The Eclipse focus is offered here as an introduction.
In a complete environment, one would need a client (consumer) of services as well as the services themselves. Since ReST is protocol driven and technology agnostic on the client and server, there is no requirement to create a client using the same technology as the service. In the present case we will walk through the development of a service and then use the browser as a client since a ReST service request is nothing more than an HTTP request.
Notes on Annotations
In the following examples, you will see a lot of Java Annotations. These are keywords prefaced by the "@" sign. The following is from the Oracle Java Tutorial
Annotations, a form of metadata, provide data about a program that is not part of the program itself. Annotations have no direct effect on the operation of the code they annotate.
Annotations have a number of uses, among them:
- Information for the compiler — Annotations can be used by the compiler to detect errors or suppress warnings.
- Compile-time and deployment-time processing — Software tools can process annotation information to generate code, XML files, and so forth.
- Runtime processing — Some annotations are available to be examined at runtime
With Java EE annotations, the standard application.xml and web.xml deployment descriptors are optional. The Java EE programming model uses the JDK 5.0 annotations feature for Web containers, such as EJBs, servlets, Web applications, and JSPs.
Annotations simplify the application development process by allowing developers to specify within the Java class itself how the application component behaves in the container, requests for dependency injection, and so on. Annotations are an alternative to deployment descriptors that were required by older versions of Enterprise applications (J2EE 1.4 and earlier).
The application components can use annotations to define their needs. Annotations reduce or eliminate the need to deal with deployment descriptors. Annotations simplify the development of application components. The deployment descriptor can still override values defined in the annotation. One usage of annotations is to define fields or methods that need Dependency Injection (DI). Annotations are defined on the POJO (plain old Java object) component classes like the EJB or the servlet.
An annotation on a field or a method can declare that fields/methods need injection, as described in Dependency Injection of Resources. Annotations may also be applied to the class itself. The class-level annotations declare an entry in the application component’s environment but do not cause the resource to be injected. Instead, the application component is expected to use JNDI or component context lookup method to lookup the entry. When the annotation is applied to the class, the JNDI name and the environment entry type must be specified explicitly.
The bottom line here is that annotations help you focus on coding and let the compiler use the annotations to "plumb" the application so that a lot of standard infrastructure can be created without you having to do so manually. It lets your web application read "easier" without having to see all of the stuff you had to write yourself in the Server/JSP module.
The following table is from Oracle's JavaEE tutorial/documentation. It lists some of the primary annotations we will be using
Summary of JAX-RS Annotations
Annotation |
Description |
|---|---|
@Path |
The @Path annotation’s value is a relative URI path indicating where the Java class will be hosted: for example, /helloworld. You can also embed variables in the URIs to make a URI path template. For example, you could ask for the name of a user and pass it to the application as a variable in the URI: /helloworld/{username}. |
@GET |
The @GET annotation is a request method designator and corresponds to the similarly named HTTP method. The Java method annotated with this request method designator will process HTTP GET requests. The behavior of a resource is determined by the HTTP method to which the resource is responding. |
@POST |
The @POST annotation is a request method designator and corresponds to the similarly named HTTP method. The Java method annotated with this request method designator will process HTTP POST requests. The behavior of a resource is determined by the HTTP method to which the resource is responding. |
@PUT |
The @PUT annotation is a request method designator and corresponds to the similarly named HTTP method. The Java method annotated with this request method designator will process HTTP PUT requests. The behavior of a resource is determined by the HTTP method to which the resource is responding. |
@DELETE |
The @DELETE annotation is a request method designator and corresponds to the similarly named HTTP method. The Java method annotated with this request method designator will process HTTP DELETE requests. The behavior of a resource is determined by the HTTP method to which the resource is responding. |
@HEAD |
The @HEAD annotation is a request method designator and corresponds to the similarly named HTTP method. The Java method annotated with this request method designator will process HTTP HEAD requests. The behavior of a resource is determined by the HTTP method to which the resource is responding. |
@PathParam |
The @PathParam annotation is a type of parameter that you can extract for use in your resource class. URI path parameters are extracted from the request URI, and the parameter names correspond to the URI path template variable names specified in the @Path class-level annotation. |
@QueryParam |
The @QueryParam annotation is a type of parameter that you can extract for use in your resource class. Query parameters are extracted from the request URI query parameters. |
@Consumes |
The @Consumes annotation is used to specify the MIME media types of representations a resource can consume that were sent by the client. |
@Produces |
The @Produces annotation is used to specify the MIME media types of representations a resource can produce and send back to the client: for example, "text/plain". |
@Provider |
The @Provider annotation is used for anything that is of interest to the JAX-RS runtime, such as MessageBodyReader and MessageBodyWriter. For HTTP requests, the MessageBodyReader is used to map an HTTP request entity body to method parameters. On the response side, a return value is mapped to an HTTP response entity body by using a MessageBodyWriter. If the application needs to supply additional metadata, such as HTTP headers or a different status code, a method can return a Response that wraps the entity and that can be built using Response.ResponseBuilder. |
Creating the Service
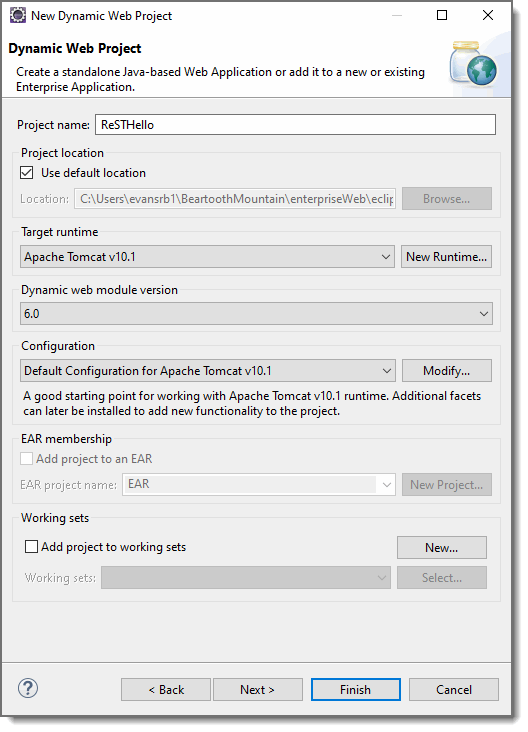
To create a new ReST service, the first step is to create a new Dynamic Web Application project from the file menu after opening the Eclipse. The figure below illustrates that selection:
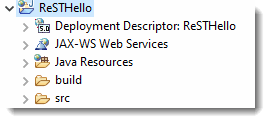
Clicking on Finish gives us a new "empty" project
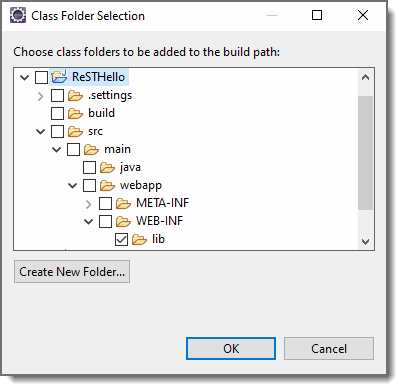
As a reminder, you must also update the build path of the project to include the WEB-INF folder of the project. This is illustrated below. Just click on the Properties and then Classpath->Add Class Folder and look for your project, expand WebContent and then select WEB-INF/lib.
In order to build our service endpoints, all of the jar files from the Jersey Framwork must be copied to our project from the api, ext and lib folders downloaded earlier. Don't copy the folders, just the jar files and make sure you copy them to the WEB-INF/lib folder in the project. That will ensure that they are available for project building and also passed to the war file that ultimately gets deployed for execution. After the jars are copied, the project should look similar to the figure below.

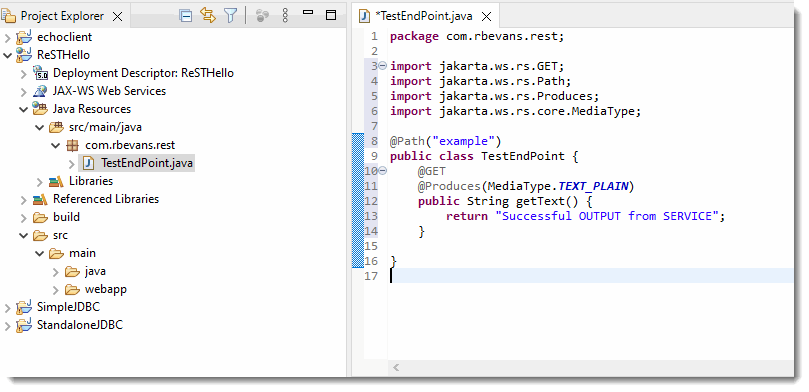
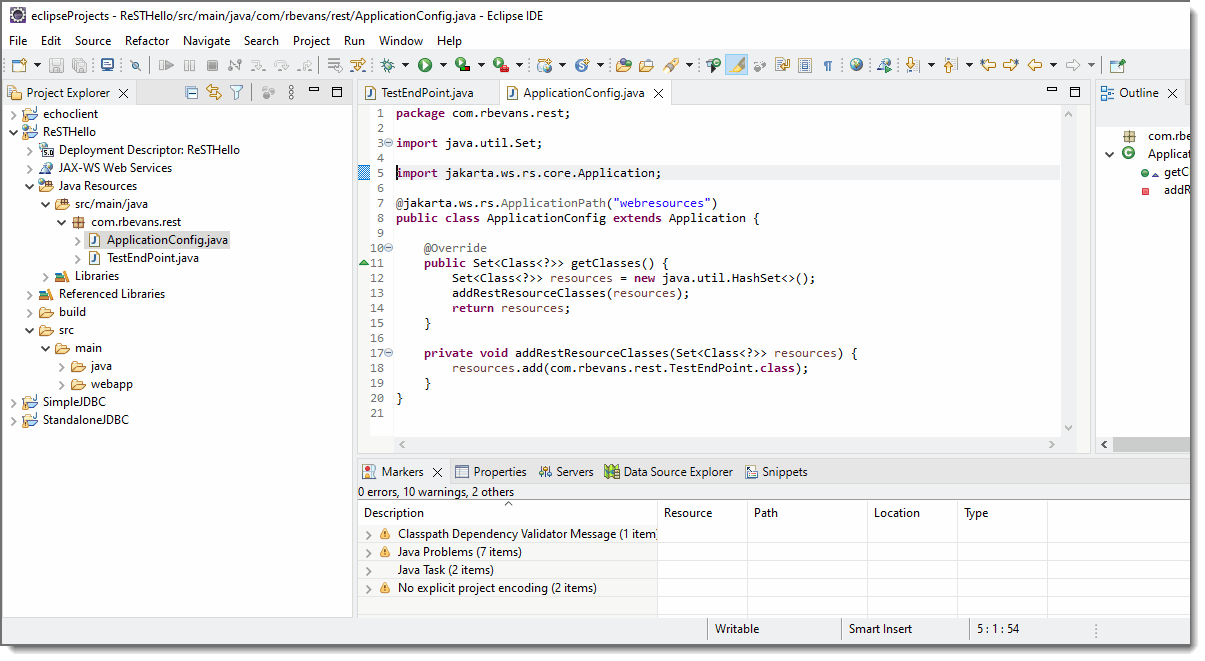
Once the project is in place, the next step is to add a package and create a class for the service endpoint. In our example we add a simple class called TestEndPoint and add the code illustrated in the figure. The actual content of the code will be detailed after we run the example.
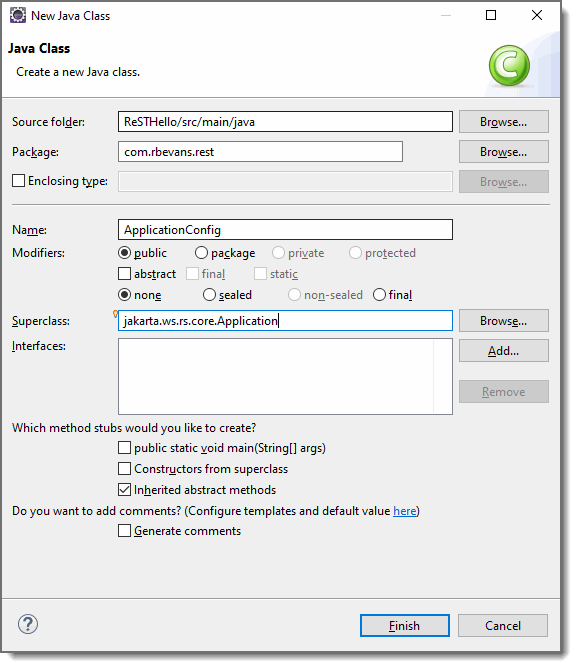
Although the project and endpoint class are in place, it is not complete until we provide a way to identify the endpoint class as a service endpoint instead of just a plain old java object. There are actually two ways to do this and both will be demonstrated in this lecture. However, for now, we will add another class that will be used to identify the class/package location of the actual service endpoints. Start by bringing up the New Class dialog in the creation of a new Java Class. In the illustration below, we arbitrarily name the class ApplicationConfig and the superclass is set (by default) to the java.lang.Object class in the JDK. In order to serve its function, the class must extend the jakarta.ws.rs.core.Application class.
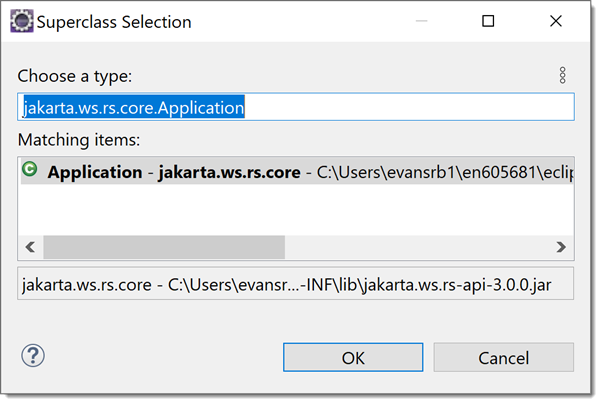
A new superclass can be found and assigned using Eclipse. Just click on the Browse... button ext to the superclass field. That will bring up another dialog box where you can type in the name of the superclass in the text field at the top. You can type the entire package name or just part of the name and the results field will display all possible matches. In the illustration below, the word Application found several matches with the desired class being first in the list.
Selecting OK to accept the new object creates an empty template for the new object that extends our desired Application parent. That template is illustrated below.

Filling out the class as demonstrated below completes the first, very basic, example of a service endpoint.
Running the example on Tomcat from Eclipse (as we did with Servlets and JSPs) runs the application and exposes the new service endpoint to clients. Using a browser as a client and accessing the service endpoint directly through the url dictated by the web application name and various annotations used in the code, provides the following UNexpected result.
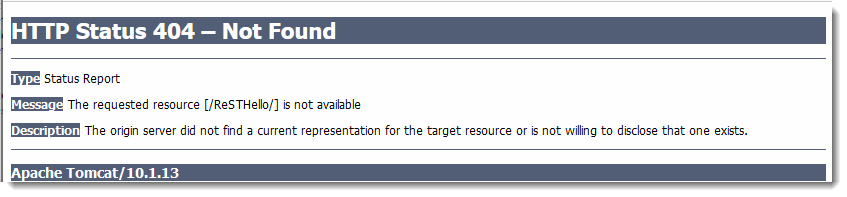
This is because Eclipse only tries to run the ReST app (Yes, I know it says ReSTv2 above, but you'll get the same result with this ReST example). You need to add on to the URL to get to the ReST app. So when Eclipse loads the URL in the browser, it will only load "localhost:8080/ReSTHello", which produces the ouput shown above.
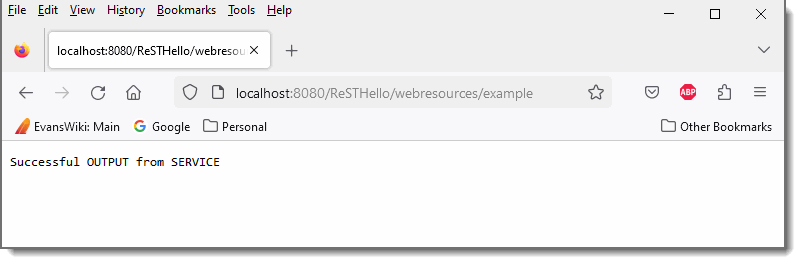
Add "/webesources/example" to the "localhost:8080/ReSTHello" URL that initiall started and you should see what is shown below!
The extended URI path to the services defined in an ApplicationPath annotation in the web application is defined in the ApplicationConfig class that was created for us with our service class. In the figure it is defined to be "webresources". The final part of the URI is the location of the service itself and that is defined by the Path annotation in the service class. This was provided in the dialog box during the service class creation.
In summary, the URL used to access services follows a basic pattern:
https://host:port/Web_Application_Context_Path/ApplicationPath/Path_to_service
In this example then the URL would be:
http://localhost:8080/ReSTHello/webresources/example
Anatomy of Our Service
In the example above, there were two classes that were created, one was a class containing an endpoint and another class which identiified the java classes that contained the endpoints. The later was ApplicationConfig and part of its code follows:
package com.rbevans.rest;
import java.util.Set;
import jakarta.ws.rs.core.Application;
@jakarta.ws.rs.ApplicationPath("webresources")
public class ApplicationConfig extends Application {
     @Override
     public Set<Class<?>> getClasses() {
     Set<Class<?>> resources = new java.util.HashSet<>();
     addRestResourceClasses(resources);
     return resources;
}
private void addRestResourceClasses(Set<Class<?>> resources) {
     resources.add(com.rbevans.rest.TestEndPoint.class);
     }
}
As is clear from the example and the listing above, this class overrides the Application class in the jakarta.ws.rs.core package and is responsible for the configuration and registration of your service classes. There are two crucial pieces in this code. The first is the annotation for ApplicationPath which informs the container (e.g., Tomcat) the URL location of your service. In the code above it informs the container to direct all requests to this web application on the path webresources to processed by the service container (Jersey). The second requirement is the overriding of the methods which creates a list of services and then adds packages containing services to that list (e.g., com.rbevans.rest.TestEndPoint.class). This class MUST override the Application class to ensure the basic functionality that is provided by the Java ReST API.
As we will see in the next section, this class is actually optional and may be replaced with configuration in the web application's web.xml file. One of the two must be present for appropriate registration and configuration of the service classes.
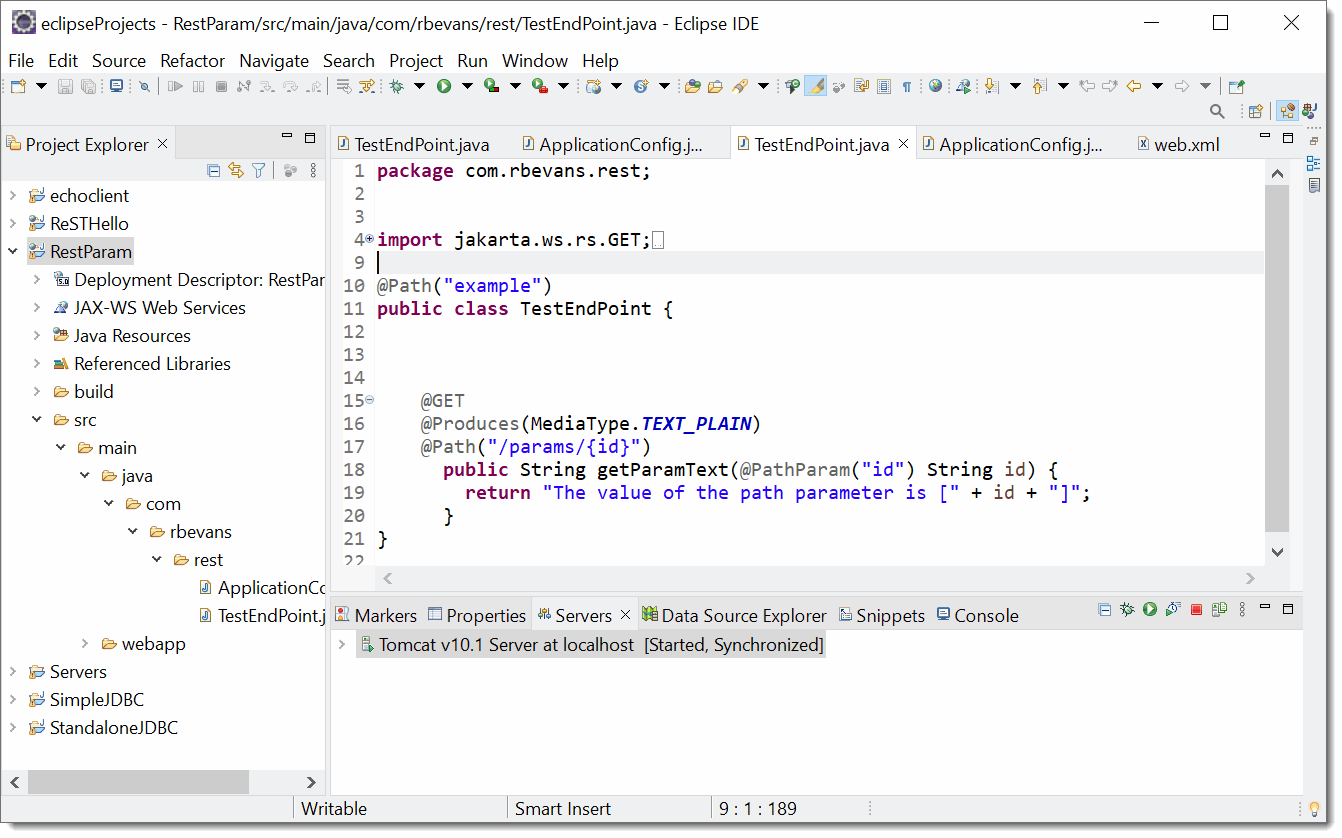
The other class in the example is a template of the service class (TestEndPoint). Here are relvant parts of that code:
package com.rbevans.rest;
import jakarta.ws.rs.GET;
import jakarta.ws.rs.Path;
import jakarta.ws.rs.Produces;
import jakarta.ws.rs.core.MediaType;
@Path("example")
public class TestEndPoint {
     @GET
     @Produces(MediaType.TEXT_PLAIN)
     public String getText() {
        return "SUCCESSFUL OUTPUT FROM SERVICE";
     }
}
The functionality provided is configured as a web service through annotations available in the Java ReST API and implemented in the Jersey implementation. The imports at the top of the code reference where they can be found in the packages for use in the code. The @Path annotation provides the additional URI path to all of the services implemented in the class when it appears above the actual Java class definition. In this example (using the webresources path where the services were registered earlier) the end points in this class will be on the path:
http://host:port/ReSTHello/webresources/example
Additional @Path annotations may be added prior to each method to further define the URL for that method. However if absent, then those methods will all be referenced by the URI specified in the class level annotation. That is acceptable provided each of the methods handles requests from distinct HTTP calls (GET, POST, PUT, etc) or expects input of different mime types through the @commat;Consumes annotation. More than one method on the same URL and accessed by the same HTTP method may not result in errors, but will most certainly result in services getting "hidden" from access.
Each service method is preceeded by an annotation specifying the type of HTTP method that will get "routed" to that method. In the example there is a method that expects a GET request. Earlier in the notes, we mentioned that the GET request is used as a &qout;read" method to access information. It can take information in the form of parameters given in the URI path, as query parameters added on the URI or even as content in the body of the request. In this example it expects nothing but the GET request and the URI identified above. There are annotations to route @POST, @PUT, @DELETE and all the available http methods.
Methods that respond to PUT and POST methods (typically used for update and creation) typically supply content in the request for the update/create on the server.
The templated code also contains an annotations for @Produces which dictates the mime type of the data that is expected in the response sent back to the client. There is also an annotation for @Consumes with the mime type of the data sent in the request. That is used primarily for PUT, POST and DELETE endpoints that expect content to come with the request. In the example above, the GET method will respond by returning a java String from the method and the @Produces annotation sepcifies that the String will be sent as plain text in the response. Other common response types include HTML (TEXT_HTML), XML (APPLICATION_XML) and JSON (APPLICATION_JSON). The XML and JSON are typically used as serialized versions of Java objects that get sent back to the client. The client would then be responsible for the parsing and understanding of the data. Without these annotations, the endpoints would not know how to handle incoming content and the client would not understand how to handle the content in the response that is returned.
It should be noted that both annotations can indicate multiple mime-types and will use the first one that can parse the input. As such if TEXT_PLAIN was to be one of those types along with APPLICATION_JSON, the JSON type should be indicated first as it would never be used if it was last as JSON would then always be treated by the TEXT_PLAIN mime-type.
Alternative to ApplicationConfig (web.xml)
Before moving on to more advanced examples and Java ReST Services, it should be noted that the ApplicationConfig class can be replaced by appropriate settings in the web.xml file that can be incorporated with any web application. Before a detailed explanation, we will go through the exercise of removing the class and adding a web.xml file.
Please note that the section below is from a Tomcat 8.5 server, so the package names are javax not jakarta. Also, this is from an earlier version of the Rest Web Services
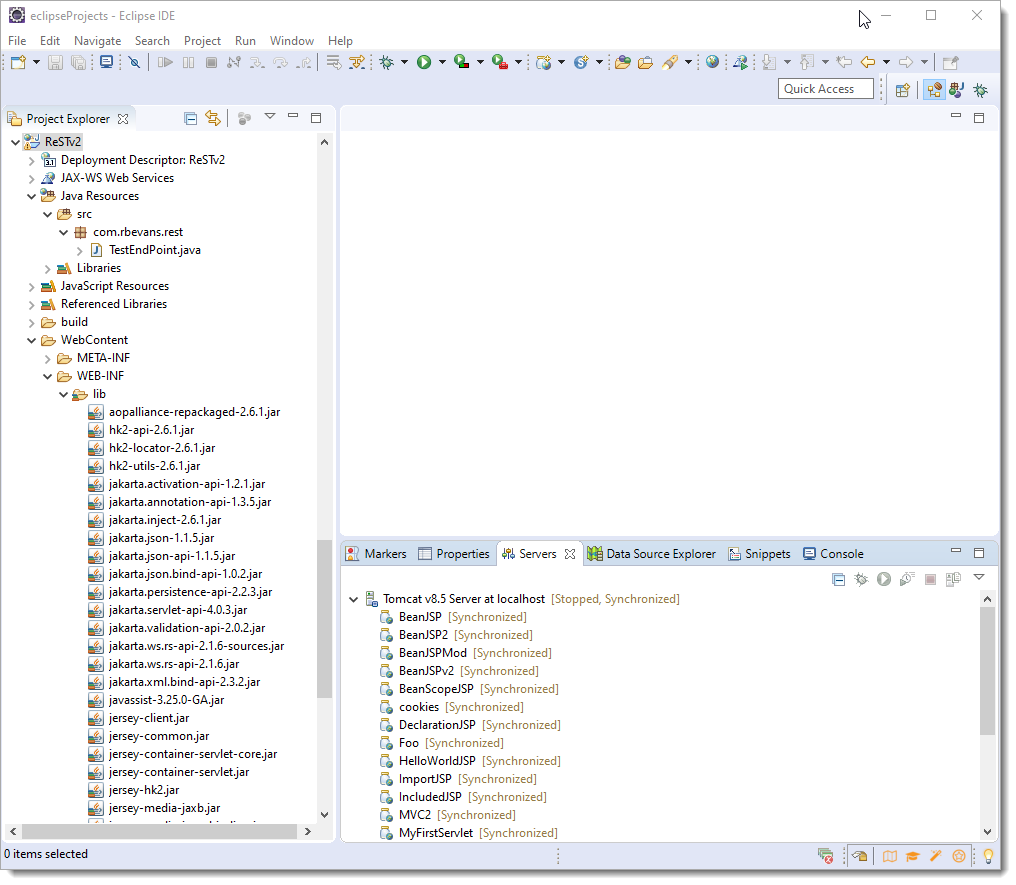
The first step is to delete the ApplicationConfig class from our project. Because I didn't want to lose my initial project, I just made a new project named ReSTv2 and copied everything BUT the ApplicationConfig class. This is illustrated in the graphic that follows:
Now we can go ahead and add a web.xml file to the web application. To do that, right mouse click on your project in the Projects Tree and select Java EE Tools and then Generate Deployment Descriptor Stub from the contextual menus.
After selecting the item in the menu the view will return to the original project with a basic web.xml file added and visible in the editor window. This is a bare minimum version that will require the addition of configuration information for deploying ReST services.

The following illustration has the necessary configuration added for the example. Before discussion each item, understanding that the Jersey ReST implementation is built around a servlet that handles much of the dispatching of services helps to associate the web.xml configuration with specific ReST functionality. After crossing that bridge, it follows from the servlet lecture that configuring the Jersey servlet (org.glassfish.jersey.servlet.ServletContainer) inside the web.xml governs its behavior.
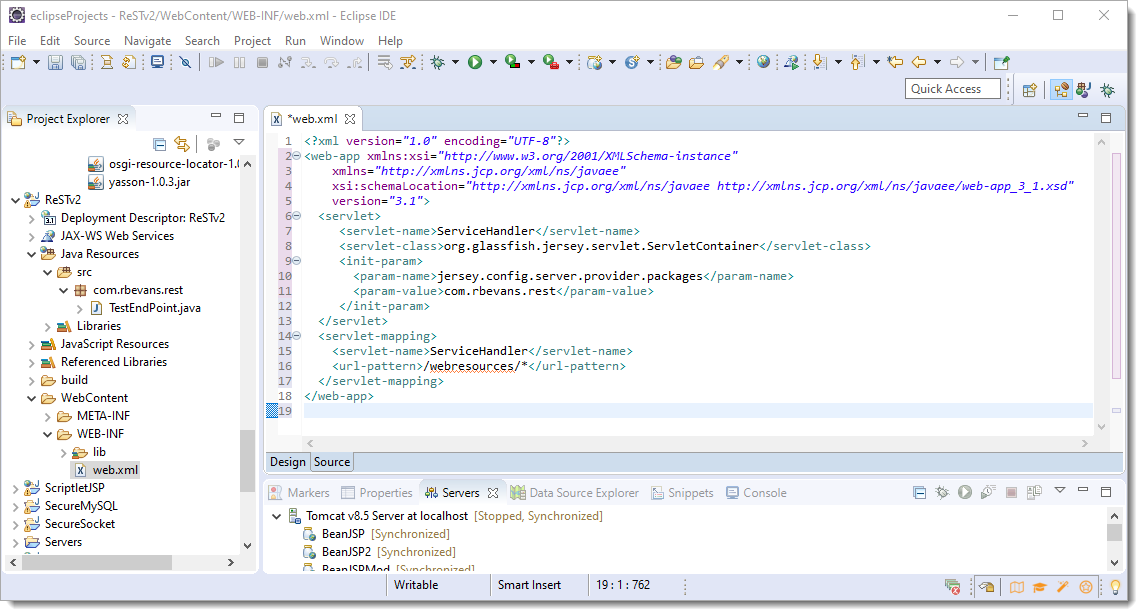
Consider the first section of the web.xml file
 <servlet>
     <servlet-name>ServiceHandler</servlet-name>
     <servlet-class>org.glassfish.jersey.servlet.ServletContainer</servlet-class>
     <init-param>
       <param-name>jersey.config.server.provider.packages</param-name>
       <param-value>com.rbevans.rest</param-value>
     </init-param>
  </servlet>
The servlet section in the web.xml file is the primary section for configuring a servlet. There is usually a section for each servlet inside a web application. In this case, it is for configuring the servlet implemented in Jersey for handling ReSTful requests to the web application. The servlet-name definition is an arbitrary name that can and will be used to reference the servlet throughout the web.xml and in other parts of the web application. That name will reference the specific class identified in the servlet-class definition. The servlet implemented by Jersey takes as an input parameter, the name of the Java package which will contain the ReST services. In this case it's the edu.rfs package where the endpoint class exists. Any other service classes, even if they contain appropriate annotations will not respond to service requests if they reside in other packages outside of edu.rfs as the file is configured.
Now that we have identified the Jersey servlet and registered our package with it, we can associate a URL path with our service calls. That way, any request to our defined URL will be processed as a potential rest call by the Jersey servlet. Requests outside of our defined path will not be handled by the Jersey servlet at all. Here is the second section of the web.xml file associated with that.
  <servlet-mapping>
    <servlet-name>ServiceHandler</servlet-name>
    <url-pattern>/webresources/*</url-pattern>
  </servlet-mapping>
In general, the servlet-mapping definition is used to associate URL paths with defined servlets inside a web application. Inside the definition we reference the servlet using the serlvet-name defined above. With that we provide a url-pattern definition which provides an expression of the URI that is appended to the base consisting of https://host:port/web-application. In this example, any request on the path https://host:port/ReSTv2/webresources/ will get forwarded to and dispatched by the Jersey Servlet as desired.
Now that we have replaced the ApplicationConfig class with a configured web.xml, rebuild the project and add it to the Tomcat server. If Tomcat is not running, start it, otherwise it should automatically republish the updated web application. Accessing the web service via a browser as done before should come up with the result seen earlier.
Passing Data to a ReSTful Web Service
At this point you should have a reasonable understanding of Java ReST services and how to implement basic ones using Eclipse. Since ReST services typically require additional information in the request (aka, parameters, content) we will use this section to provide a basic understanding of that passing of information and provide a foundation for implementing services that accept paramters as input.
There are several ways to pass information to a ReST service. One way is to attach content to the body of an http request. This is mapped by Jersey to parameters in the Java method signature that implements the service. Using the Java Architecture for XML Binding (JAXB), the content from the client is typically marshalled from text into a Java object that is employed in the business logic on the back-end. On the response, data is unmarshalled from Java objects back into serialized text (XML, JSON, etc) that is appended to the HTTP response as content. We will not cover the specifics of that in this foundation course.
Another way is to take advantage of annotations that are used to bind HTTP requests into the web service methods. We will focus on three of them:
- @PathParam which binds parts of the URI passed in an HTTP request to parameters in the Java method signature
- @QueryParam which binds query parameters in an HTTP request to the parameters in the method signature
- @FormParam which binds the parameters passed from an HTML form (urlencoded string attached as content to a POST) to parameters in the method signature
PathParam
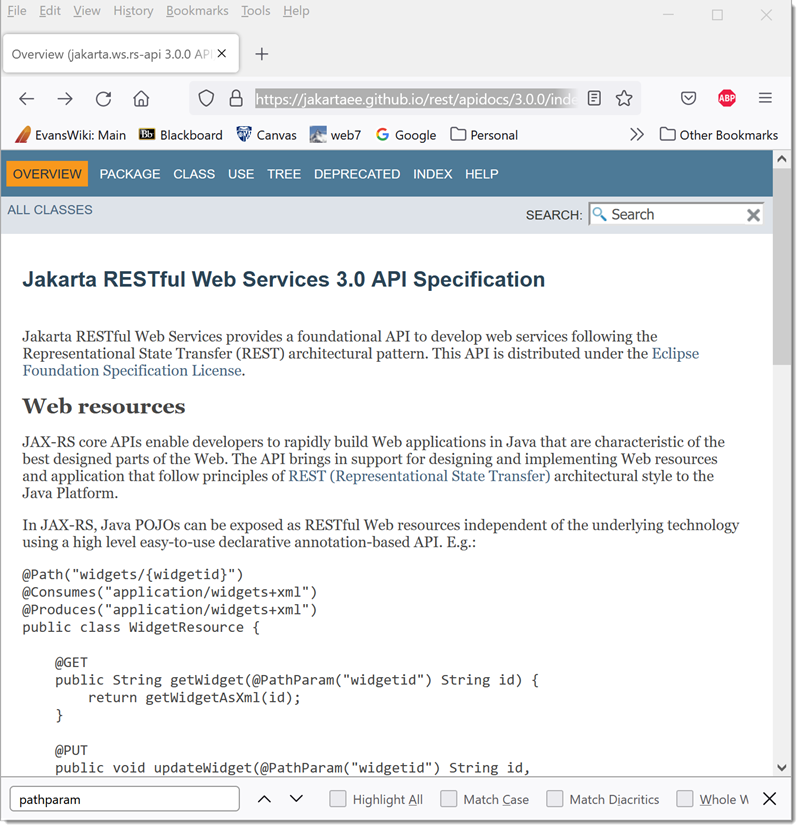
The @PathParam annotation is part of the ReST API provided in the jakarta.ws.rs package. In order to incorporate it, any service class must import it from that package. The following line must be added to the imports in the service class:
import jakarta.ws.rs.PathParam;
The specific service method that will expect a parameter in the URI path must specify that URI path using the @Path annotation so that those requests are dispatched to that method. To identify a variable in the URI versus a hardcoded string, the name of the parameter must be wrapped in curly brackets. As an example consider the following Path statement:
@Path("/params/{id}")
The statement, preceeding a method signature would indicate that the URI path /params/ should be appended to any earlier defined path, and that any text that followed would be ingested and associated with the key "id" that would need to be bound to a method parameter using the @PathParam annotation.
The @PathParam is represented inline in the method signature and it preceeds the method parameter that it binds to the path paramter as follows:
public String getParamText(@PathParam("id") String methodId) {
The annotation is followed by the key name that matches the name passed in the @Path and is followed by the associated java parameter that get's passed that value. For the above example, the id parameter is pulled from the path and placed in the methodId variable used in the method. The name of the java parameter is arbitrary and can even match the name of the key passed in the PathParam (e.g., id).
As an example add the following method to the TestEndPoint class created earlier in this lecture.
First, add the following import
import jakarta.ws.rs.PathParam;
Next, add the following method
  @GET
  @Produces(MediaType.TEXT_PLAIN)
  @Path("/params/{id}")
  public String getParamText(@PathParam("id") String id) {
    return "The value of the path parameter is " + id;
  }
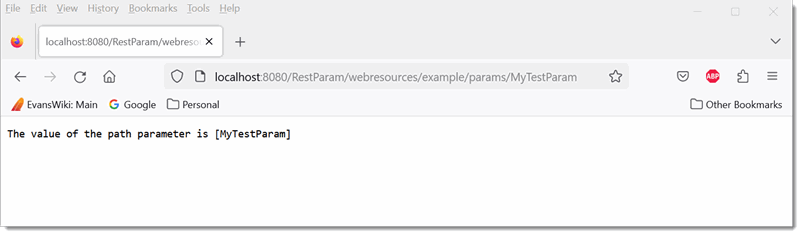
The method should handle client requests to the URL:
https://localhost:8080/RestParam/webresources/example/params/any-text-here
It should return the string The value of the path parameter is any-text-here
The illustration below shows the example with the expected output in a client browser. The text used at the end of the URL is "MyTestParam"
With the web browser showing
QueryParam
The @QueryParam annotation binds values from HTTP query parameters to the parameters in the Java service method. Like the @PathParam, it preceeds the java variable in the method signature and contains a mapping to a "key" that represents the HTTP request query parameter name. The method parameter variable assumes the value of the query parameter by that name. For example:
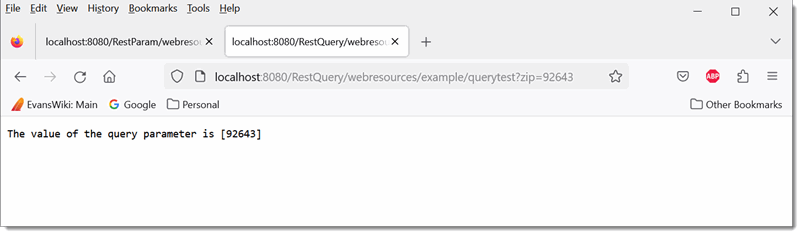
@Path("/querytest/")
public String getParamText(@QueryParam("zip") String zipCode) {
This method would expect that the value of a query parameter named zip send to the URI path represented by this method would be assigned to the zipCode variable. Note that in the case of a request parameter, there is no mention of the parameter in the @Path annotation.
Any request to the following URI pattern would end up in this method with zipCode assigned the value of 20723.
/querytest?zip=20723
As with the@PathParam, there will need to be an import statement so that the service method recognizes the @QueryParam annotation from the jakarta.ws.rs package api.
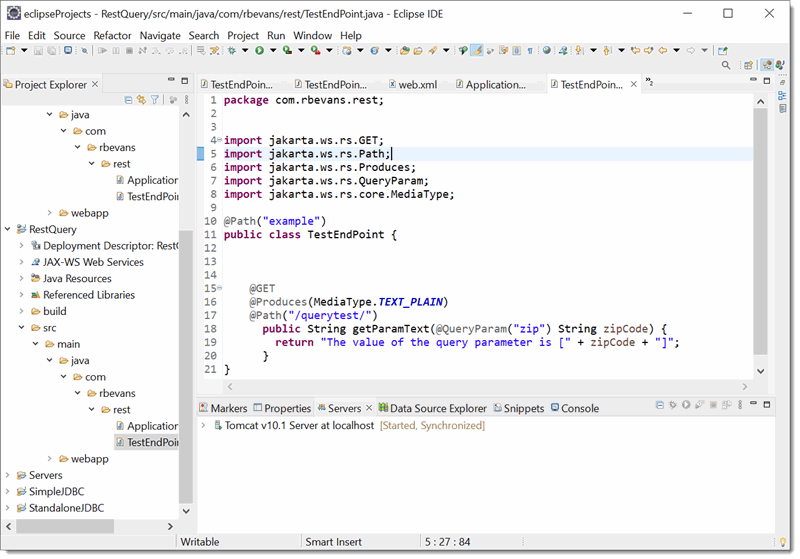
Adding a query parameter to our previous example results in the following code and output upon execution/request from a browser:
FormParam
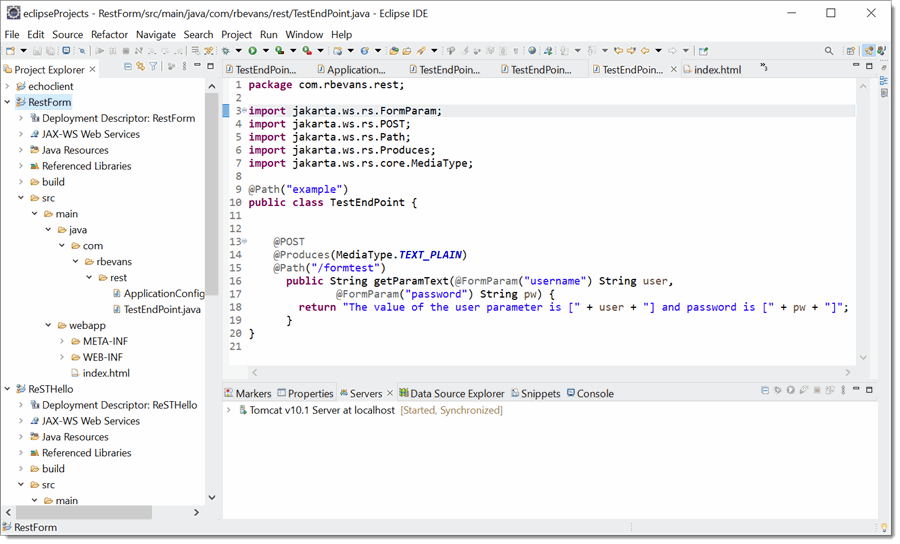
The @FormParam annotation binds values from form parameters contained within a request body (e.g., as the result of a POST) to a method parameter in the Java service method. Like the @QueryParam annotation, the @FormParam annotation precedes the the java variable in the method signature and maps it to a "key" that represents the HTTP parameter passed in the POST method (or from the HTML form). For example the following code:
@Path("/querytest/")
public String getParamText(@FormParam("username") String user, "password") String pw) {
Would expect HTTP parameters in the body of the incoming request that look like:
username=newuser&password=secretpw
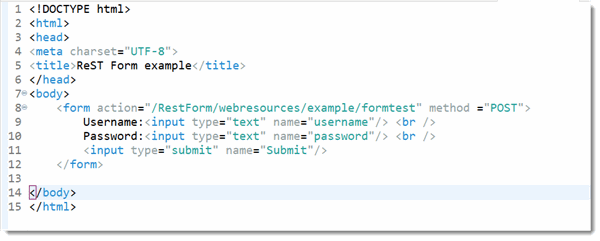
That might come from an HTML form that looks like the following:
<form action="/path_to_service_method" method="POST">
  Username:<input type="text" name="username"/>
  Password:<input type="text" name="password"/>
  <type="submit" name="Submit"/>
</form>
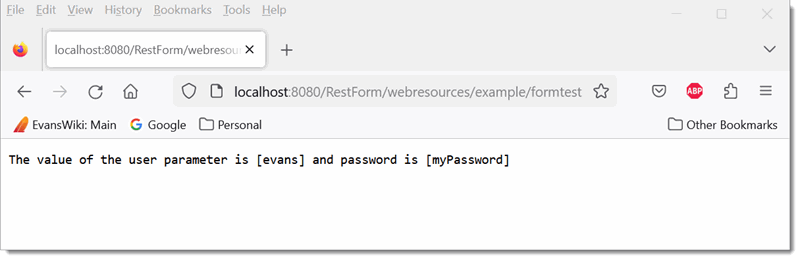
The following illustration shows the source code in the post method and the source code for the html form that will call into it with the form parameters. Imposed over the code is the calling window for the form which requests a username (bob) and password (jhuep) and the browser with the results of the query after the submit button has been pressed.
Note that the @GET line has been changed to @POST.
You also need to create an index.html under the webapps directory to use to POST the form
And if you run this on your server:
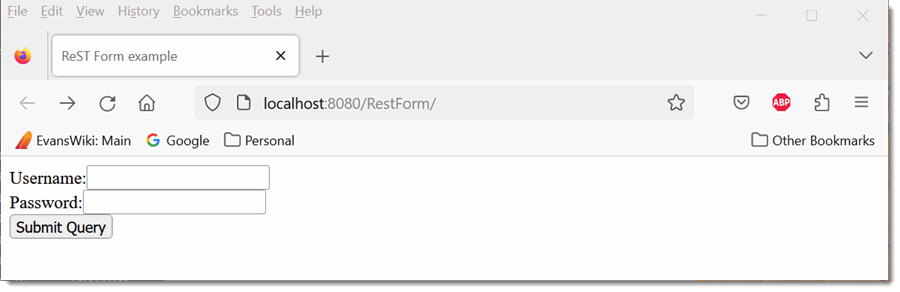
If you fill in the username and password......
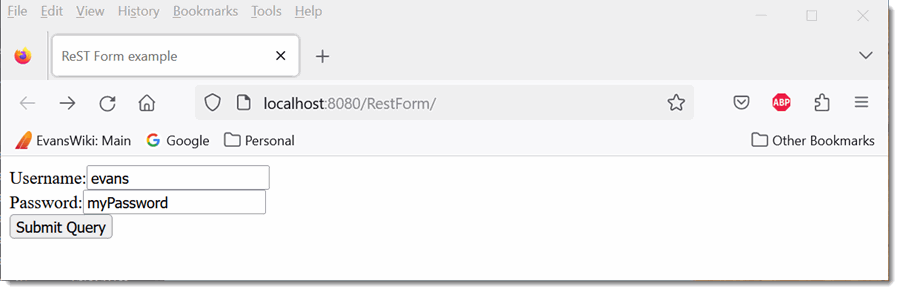
And then click on the Submit Query button...
I am providing a zip of this project, but be advised, it won't run on your system without updating installation paths, java versions etc.... RestParam.zip
Final Comments on Binding Parameters from HTTP Requests
In this lecture we really have only skimmed the surface of Java ReST services and passing parameters. There are several other annotations that are provided by the jakarta.ws.rs package that are used for passing information through HTTP requests. Either as parameters or through other HTTP constructs like request headers, cookies and other parts of the URI/URL. The following list provides just a sample of those not covered in the current lecture:
- @MatrixParam
- @HeaderParam
- @CookieParam
If you wish to explore these topics further I would refer you to the jakarta.ws.rs API for descriptions of the annotations, parameters, methods and classes. I would also refer you to various tutorials available on the web at sites like www.mkyong.com, www.drdobbs.com, www.vogella.com, www.tutorialspoint.com and many others.
Summary
This lecture provided an introductory view on the legacy of web services from Simple Object Access Protocol through the current Representational State Transfer Services with an explanation about the evolution from one to the other. After an overview of ReST and a short background of Java and ReST we walked through the development of ReST services in Java using Netbeans. Despite the use of Netbeans, the real takeaway is the composition of a ReST Service Application in Java and some specific constructs for the service itself and things like consuming inputs and producing outputs, ingesting parameters, etc.
Reiterating a statement from the previous section, this lecture was merely an introduction in a foundation course to give you a start in the understanding and implementation of ReSTful web services using Java. If you continue down this track, you will surely encounter additional and more in depth material as you advance through your courses. Until then, if you wish to learn more on your own I would encourage you to follow up with the tutorials and references provided in this lecture as well as further exploration around the web.