Menus with JavaScript and CSS!
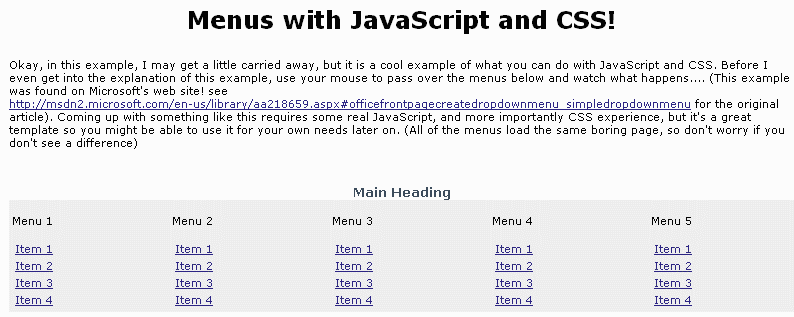
Okay, in this example, I may get a little carried away, but it is a cool example of what you can do with JavaScript and CSS. Much of the more interesting animation in web pages is done with a combination of tools. Before I even get into the explanation of this example, use your mouse to pass over the menus below and watch what happens.... (This example was found on Microsoft's web site! see https://msdn2.microsoft.com/en-us/library/aa218659.aspx for the original article). Coming up with something like this requires some real JavaScript, and more importantly CSS experience, but it's a great template so you might be able to use it for your own needs later on. (All of the menus load the same boring page, so don't worry if you don't see a difference)
Main Heading
|
Menu 1 |
Menu 2 |
Menu 3 |
Menu 4 |
Menu 5 |
So, how does it work? First, most of the "menus" that you see when your mouse passes over the main menu are actually tables! If you look at the source code for the table above, you'll see that the table looks something like this...
<table class="navbar" width="800">
   <tr>
      <td class="menuNormal" width="160" onmouseover="expand(this);"
      onmouseout="collapse(this);">
        <p>Menu 1</p>
        <div class="menuNormal" width="155">
          <table class="menu" width="155">
            <tr><td class="menuNormal">
              <a href="page.htm" class="menuitem">Item 1</a>
            </td></tr>
            <tr><td class="menuNormal">
              <a href="page.htm" class="menuitem">Item 2</a>
            </td></tr>
            <tr><td class="menuNormal">
              <a href="page.htm" class="menuitem">Item 3</a>
            </td></tr>
            <tr><td class="menuNormal">
              <a href="page.htm" class="menuitem">Item 4</a>
            </td></tr>
          </table>
        </div>
      </td>
      ... and so on for the other Menus (Menu2 through Menu5)...
The CSS style sheet that is used can be found here at the file "menu.css". If you remember, the "class" attributes specify CSS styles that are defined in the the css file. The values of widths are somewhat hardcoded, so if you adjust one, you may have to tweak them all.
The table is made of a single row, that contains multiple columns for each main menu item. If you look at the <td> tags in the table, you'll notice that each has an onmouseover and onmouseout event handler which calls JavaScript functions expand() and collapse(). These JavaScript functions modify the CSS mapping of the table to either show or hide the table. You'll notice that each cell in the primary row has a <p>Menu N</p> item AND A <DIV> TAG. This <div> tag uses a CSS style to control its visbility. When the mouse isn't over the menu items, the <div> tag uses the menuNormal style on the <div> tag which "hides" the <div>, when the mouse moves over the <div> section, the JavaScript function expand() causes the <div> tag to use the menuHover style instead.
So the "menu"s you see on the page aren't really menu's in the sense of most GUI menus, but actually table cells that are being made visible. Each cell contains a sub-table that looks like the menu selection. The individual menu items are just hyperlinks in a table cell that are rendered differently than a usual underlined link. If you disable the CSS sheet for the page, you'll see a very plain looking table like this:
Sample of this same page with the menu.css CSS styles disabled |
 |
One thing to notice in the JavaScript. First, the script is now located in an external file, menu.js. This is done by including this line in the <head> section of the page:
<script language="javascript" src="menu.js"></script>
The expand() function listed in menu.js takes one parameter, a <td> eleement. The function first gets the <div> tag that is contained n the <td> element, and then associates the menuHover style with the <td> element and the <div> tag. The collapse() method just sets the style back to menuNormal.
Why do the "hover" table elements appear over the existing text. The position property of their CSS style is set to absolute. This causes the <div> element to appear as if it is overlayed over the text and images on the page. If we didn't use the absolute property, the expanding menu would have just slid the text below it farther down the page to make room for its "showing".
The original article on the Microsoft web site even gives instructions on how to create cascading menus, but you can now visualize that it just making more <div> tags with tables appear or disappear.
