
Java Network Programming
Important note on images in this module
Please note that the screenshots in this section were made with an earlier version of the JDK and Elipse. Since everything covered in this module still works the same in the latest JDK/Eclipse versions, they have not been updated as they fully apply.
Required Reading
The Java Tutorial on Networking. Read the sections on
Networking Basics
Every computer (real or virtual) on a network is identified by a name and/or unique IP address. The names of the computers are there for convenience as they are mapped to IP addresses by a Domain Name Server (DNS), which keeps track of the mapping.
For example, the computer beartoothmountain.com has an address of 169.0.229.42. If you typed "ping beartoothmountain.com" the DNS server would map that name to the IP address and direct the network traffic to that address.
One host can run multiple servers of the same or distinct protocols attached to different ports. A port is a connection point to a computer, and you can think of it as a sub-address to the main IP address. There is a list of "well-known" ports that every computer supports. These are services so basic or common, that they have the same port number on every system. For example
- ftp: 21
- ssh: 22
- telnet: 23
- smtp: 25
- httpd: 80
- pop: 109
You can see a complete list of the names here.
It turns out that ports 1023 and below are reserved as system ports. This means unless special configuration is accomplished, only root can use these ports. Ports 1024 are open for use by anybody, but 1024 to 5000 may be more commonly used, and you may have a conflict if you make up a number. If you want to use a port higher than 5000, you should be relatively safe, but some webservers use higher number ports unless reconfigured to use port 80 (weblogic uses 7001, tomcat uses 8080).
Java has a class named InetAddress, which represents both IPv4 and IPv6 interfaces. There is no constructor, as this class only has static methods to get information. There are several methods to get InetAddress(es) from a host:
method |
function |
| getLocalHost() | Returns the InetAddress of the local host |
| getByName(String host) | Determines the IP address of a host, given the host's name |
| getAllByName(String host) | Given the name of a host, returns an array of its IP addresses, based on the configured name service of the system. |
Once you have the InetAddress, there are methods to pull off
- the IP values: byte[] getAddress
- the host name: String getHostName()
- the host address: String getHostAddress()
In JDK 1.4, Sun also introduced the NetworkInterface class to allow you to get more information on the actual interface on your computer. This class represents a Network Interface made up of a name, and a list of IP addresses assigned to that interface.
In JDK 1.6, Sun added methods to the NetworkInterface class to provide the following additional information on the interface
- Broadcast address
- Subnet mask
- Mac/hardware address
- MTU size
- State (up/down)
- Know if network interface supports multicasting
- Know if network interface is the loopback interface
- Know if address is dynamic
- Enumerate logical (virtual) interfaces instead of physical interfaces
Client vs. Server Definition
The traditional definition of a client/server arrangement is:
- Client: User of network services
- Server: Supplier of network services
The problem with this definition is that with many modern programs that exchange data, it is unclear just who the "server" is. The easiest way to define the roles is:
- Client: Program which connects to a host/port.
- Server: Program which runs on a host. It is running first, and the client connects to it.
Clients
Wait a minute, if the server has to start first, why cover clients first? Two reasons really, clients are easier to understand how to use, and we can test clients to an existing server. For our case, you will initially connect to test servers that have been written expressly for your clients.
One thing to remember before we begin. Java clients need not communicate just with Java servers. Yes, there may be some situations where this is true (Java RMI), but for the most part, the connection protocols are language independent.
It turns out that the "telnet" program is actually a good way to manually test with other protocols. That is because you can specify what port telnet should connect to. You may have to provide specific information to the port connection to get usable output, but something as simple as connecting to a Time-of-day service can be done as follows:
If you bring up a command/shell window (and if you have telnet on your system) and type:
telnet time-A.timefreq.bldrdoc.gov 13
You will connect to port 13 of host time-A.timefreq.bldrdoc.gov at port 13. You will see the following in your window.
By the way, if I haven't mentioned it already, telnet is an ancient program, and really isn't supported to use as it was originally intended...but...it is an outstanding debugging tool, because it is a very simple program that can connect to any active port. It is a great tool to see if a port is open and listening for incoming connections.
Our use of telnet shows the time of day from the time server.
So, back to our topic.... To implement a network client, you need to do the following:
- Create a Socket object
- Create an output stream to send data to the socket
- Create an input stream to read server response from the socket
- Do I/O with the server using I/O streams
- Close socket
Let's look at how to do this step by step.
1. Create a Socket object
Use the java.net.Socket object to create the client sockets. A Socket is the endpoint of communication between two hosts. Once you have a socket, you can get Input and Output Streams from it with a simple call
Socket socket = new Socket(host, port);


InputStream in = socket.getInputStream();


OutputStream out = socket.getOutputStream();


// do stuff


socket.close();
Pretty simple! Now you can use your I/O Streams skills and say, "wait...can't I wrap Buffers and Writers around these streams?" But of course you can.
PrintWriter pout = new PrintWriter(socket.getOutputStream(), true);


BufferedReader bin = new BufferedReader(new InputStreamReader(socket.getInputStream));
Wait! you say...what is that "true" you snuck in on the PrintWriter constructor? If you look at the API, this turns on automatic line flushing, which is usually the behavior you want.
2. Create an output stream to send data to the socket
3. Create an input stream to read data from the socket
In the example you'll run in a few moments, you see below how the input and output streams are created.
Socket echoSocket = null;


  PrintWriter out = null;


  BufferedReader in = null;
 try {

   echoSocket = new Socket("your_computer");

   out = new PrintWriter(echoSocket.getOutputStream(), true);

   in = new BufferedReader(new InputStreamReader(echoSocket.getInputStream()));

 } catch (UnknownHostException e) {

   System.err.println("Don't know about host: your_computer");

   System.exit(1);

 } catch (IOException e) {

   System.err.println("Couldn't get I/O for "

   + "the connection to: your_computer");

   System.exit(1);

 }
Note that the Socket is created, and then the getInputStream() and getOutputStream() methods are used to get the initial streams used. Note that there are two exceptions that must be handled, the UnknownHostException from the Socket constructor and the usual IOException on the creation of the streams.
4. Do I/O with the server using the streams created
Now that we have streams, you can use the readLine() and println() methods to move data!
BufferedReader stdIn = new BufferedReader(

   new InputStreamReader(System.in));

   String userInput;
 while ((userInput = stdIn.readLine()) != null) {

   out.println(userInput);

   System.out.println("echo: " + in.readLine());

   }

}
5. Close the sockets
When you are done, close the sockets! If you don't, they may eventually time out, but you always want to close the sockets!
   out.close();
	in.close();
	stdIn.close();
	echoSocket.close();
Practice Echo Client Program
Here is a test client Java program, echoclient.
There are two things to note with this project. First, notice that when reading from the socket stream, if null is returned, we assume the connection is lost and terminate.
The second, and most important aspect is that this is a console based program. Instead of running the program from Eclipse, you want to run it from a "Runnable JAR file". So, to make a runnable jar file.
- First, run the application first as just a Java application, it may not run, but you'll need a default run configuration that will be genereated for use in a later step.
- "export" the project as a runnable JAR file
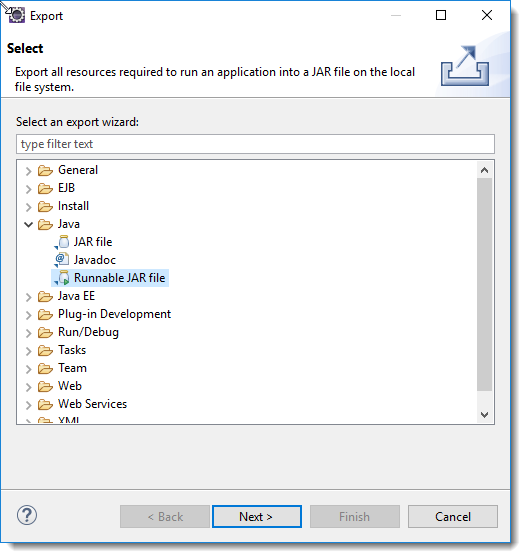
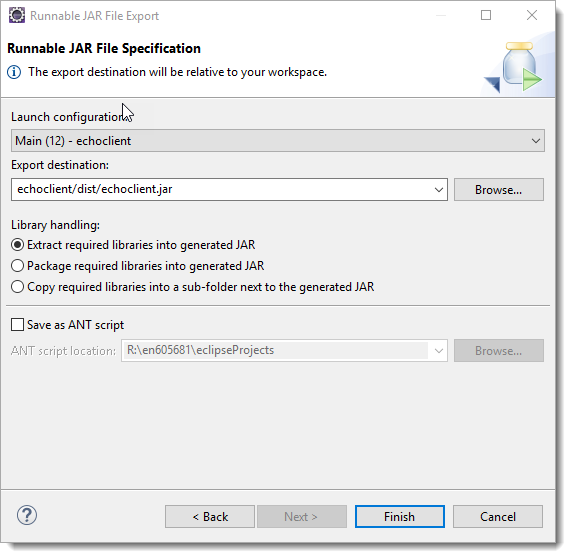
- Select the launch configuration. This is just basically setting up the enviornment, since we don't need anything special, we'll use the default. Look for the class name (yeah, I used "Main" a lot in the examples, but look for the echoclient one and use it.

- And export the JAR to a directory of your choice. I made a "dist" directory and then placed the JAR file there
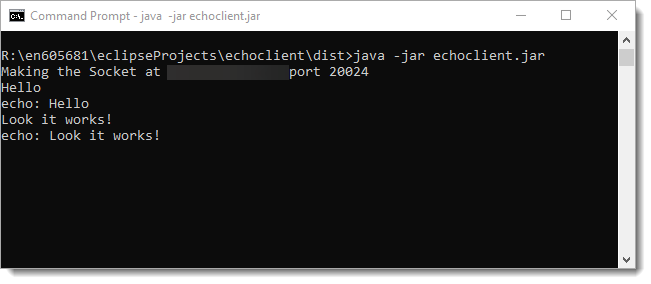
- Open a command window/shell and cd to the project directory
- cd dist (this is where the jar files are built)
- Make sure java is in your path and then type java -jar echoclient.jar
- The echoclient is packaged into a jarfile by Eclipse
- The java -jar echoclient.jar tells the jvm to run java on the jar file. Inside of the file is a file called MANIFEST.MF, which contains information as to which class to run when run as an application.
Contents of MANFEST.MF for the echoclient project |
| Manifest-Version: 1.0 Main-Class: echoclient.Main Class-Path: . |
When you run the application from your command line, it should look like this:
Parsing lines of text
At this point, we can now use Streams and make a simple Network client. Before we continue to making a Socket server, let's look at some techniques to parse a line of text read in by the readLine() method.
In the early days of Java, a class called StringTokenizer was used to parse a String into sub-components. Modern Java style recommends using two different classes.
The first option is to use the split() method of java.lang.String. The figure below shows the API documentation on split. It allows you to use any pattern you want to split the String into an array of Strings. The big advantage of this method is that once the String is split, you can access the tokens in any way you see fit, as opposed to the more serial way with StringTokenizer.
String.split() method documentation |
 |
If you need something more powerful than the simple tokenization provided by split, you can always use the java.util.Scanner class. This class uses any Regular Expression supported by Java to parse a String.
Network Client Practice Example
In this example, we will connect to an http server and print out the header information for the requested page.
As you remember, the default port for http is port 80. It turns out that when you issue HTTP commands, you need to submit the command with two carriage returns.
- GET /index.html HTTP/1.1
- POST /HWAssign.html HTTP/1.0
- HEAD /index.html HTTP/1.1
Long ago, when http was standard, if you telnet to www.google.com and type
HEAD /index.html HTTP/1.1<cr><cr>
The HTTP response will look something like this
This is in the standard form of
HTTP-version Status-Code Status-Message


header1-name : header1-value


header2-name : header2-value


<DOCTYPE HTML PUBLIC....


...


</HTML>
Where the first section is the HTML header, and the second is the HTML document content. Note that if you use the GET command, the server will disconnect after giving you the web content. You will see a "Connection closed by foreign host." message. This is perfectly normal.
I used to have a few more exampoes of opening http connections to web pages and creating a client to pull off information from port 80. With the transition to https, that isn't as easy as it once was, so we are going to progress to writing our own socket server.
Implementing a Server
Implementing a simple server isn't much harder than making the client. Note the words "simple server". There is one huge flaw in the server that we will design in this section...see if you can tell what it is before we talk about it at the end.
To create a simple server:
- Create a ServerSocket object (java.net.ServerSocket)
- Wait for a socket request from a client, then create a Socket object. (java.net.Socket) from the ServerSocket
- Create an input stream to read client input (java.io.BufferedReader for text)
- Create an output stream that can be used to send info back to the client (java.io.PrintWriter for text)
- Do I/O with the input and output streams
- Close the socket when done.
The java.net.ServerSocket class is specifically used to wait and handle requests from Transmission Control Protocol (TCP) clients. There are four different constructors for the ServerSocket class, ranging from an unbound object, to one bound to a single port, to one that is bound to a port and a single InetAddress for a multi-homed interface.
Most of our examples will use the simple:
ServerSocket server = new ServerSocket(port);
which creates the ServerSocket object. You then call accept() which blocks until a connection is made
server.accept();
At this point, you can create incoming and outgoing Streams, and then just call
server.close();
At the end to close the ServerSocket object. Note that closing the ServerSocket also closes the associated input and output streams.
Spotted any problem with the logic flow above? If you noticed that the server only handles a single connection, then you are correct. Typically a server has a loop similar to this:
int i= 0;

...

ServerSocket listener = new ServerSocket(port);

Socket server;

while ((i++ < maxConnections) || (maxConnection == 0)) {

  server=listener.accept();

  handleConnection(server);

}

...
The handleConnection(server) call above will typically start a new Thread to handle the incoming connection. This lets a server handle multiple clients at the same time. We'll learn how to do this in a later module, for now, let's make a simple server to our echo client we saw above.
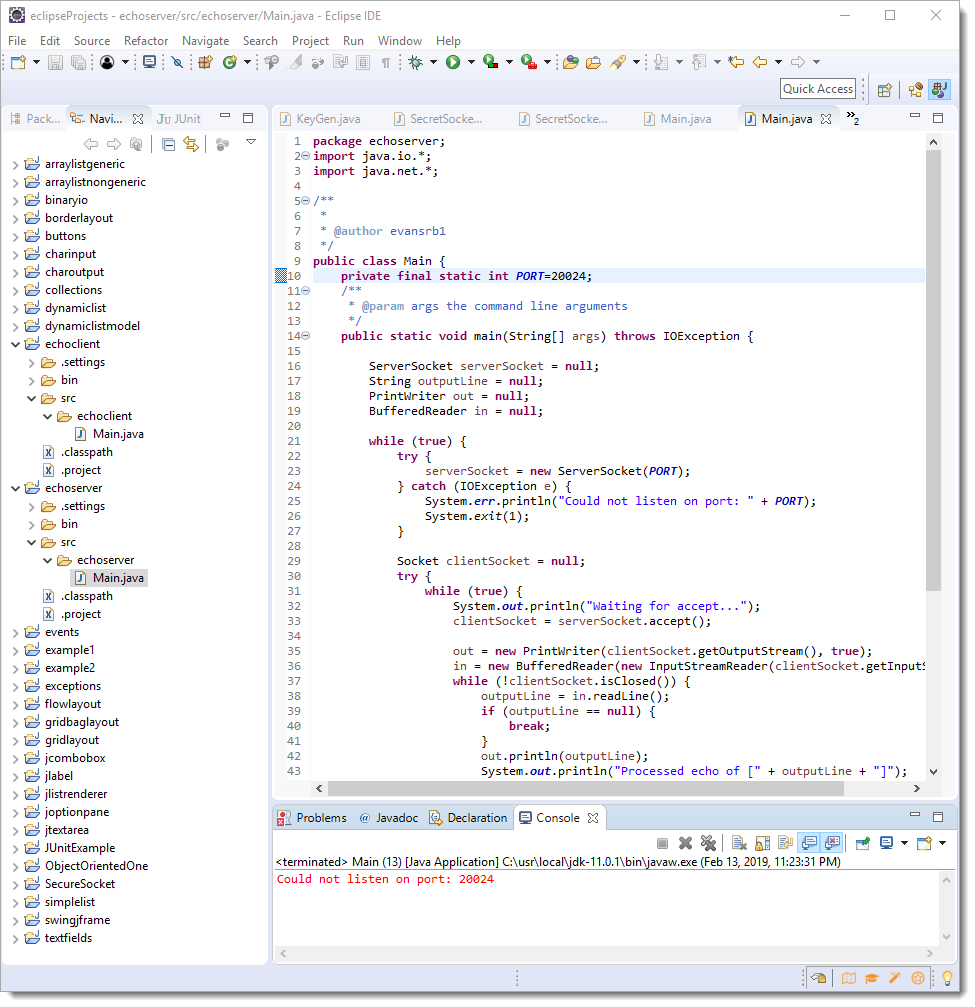
Download and open the Netbeans project echoserver. This is a sample application that you can't really run on your system. Nothing prevents you from modifying the port number and then moving it to the class computer to try out the code.
Take a look at the screenshot below which shows the bulk of the code. You can see the patterns we showed above in the code in this example. One variation is that the entire ServerSocket acceptance of a client is wrapped in a while(true) loop. This keeps the server going at all times. This is the code that is running as the echoserver for the echoclient example.
Okay, to test and run this example you need to do several things:
- Run the echoserver from Eclipse
- Open up a command window and then run echoclient.jar. You can pass the arguments "localhost" and "20024" (without the quotes) to the echoclient.jar, this will tell it to connect to your local machine vice web1
- Now you can type text in the echoclient, and see it being processed on the server and then echoed back to the client.
Ah, some of you may be asking "localhost"? localhost is a special shorthand hostname for your machine, the "local host". It is always translated to 127.0.0.1, which by default is always the local host machine. That way you don't have to know the actual network name of the local machine, because localhost always works. Please remember, that "localhost" WILL NOT work when you do your homework, you will need to replace the host name with web1 for it to work when I grade your homework. Leaving in localhost will cause your program to fail and you will lose points.